Seeed MeshCore Starter Kit: Solar Repeater + Client Bundle
Seeed's MeshCore Starter Kit bundles a solar repeater and Wio Tracker L1 Pro into one off-grid mesh. Antenna picks, setup tips, and who it's for.
Seeed Studio quietly released a MeshCore version of their starter kit. The bundle pairs a SenseCAP Solar Node P1-Pro repeater with a Wio Tracker L1 Pro companion node, both pre-flashed for MeshCore, both running on the same Nordic nRF52840 plus Semtech SX1262 platform. The Meshtastic version is still available too. Same hardware, different firmware path. List price is $132.80 for the two devices. Both devices ship with their stock antennas in the box, plus the cables and brackets you need to get on the air.
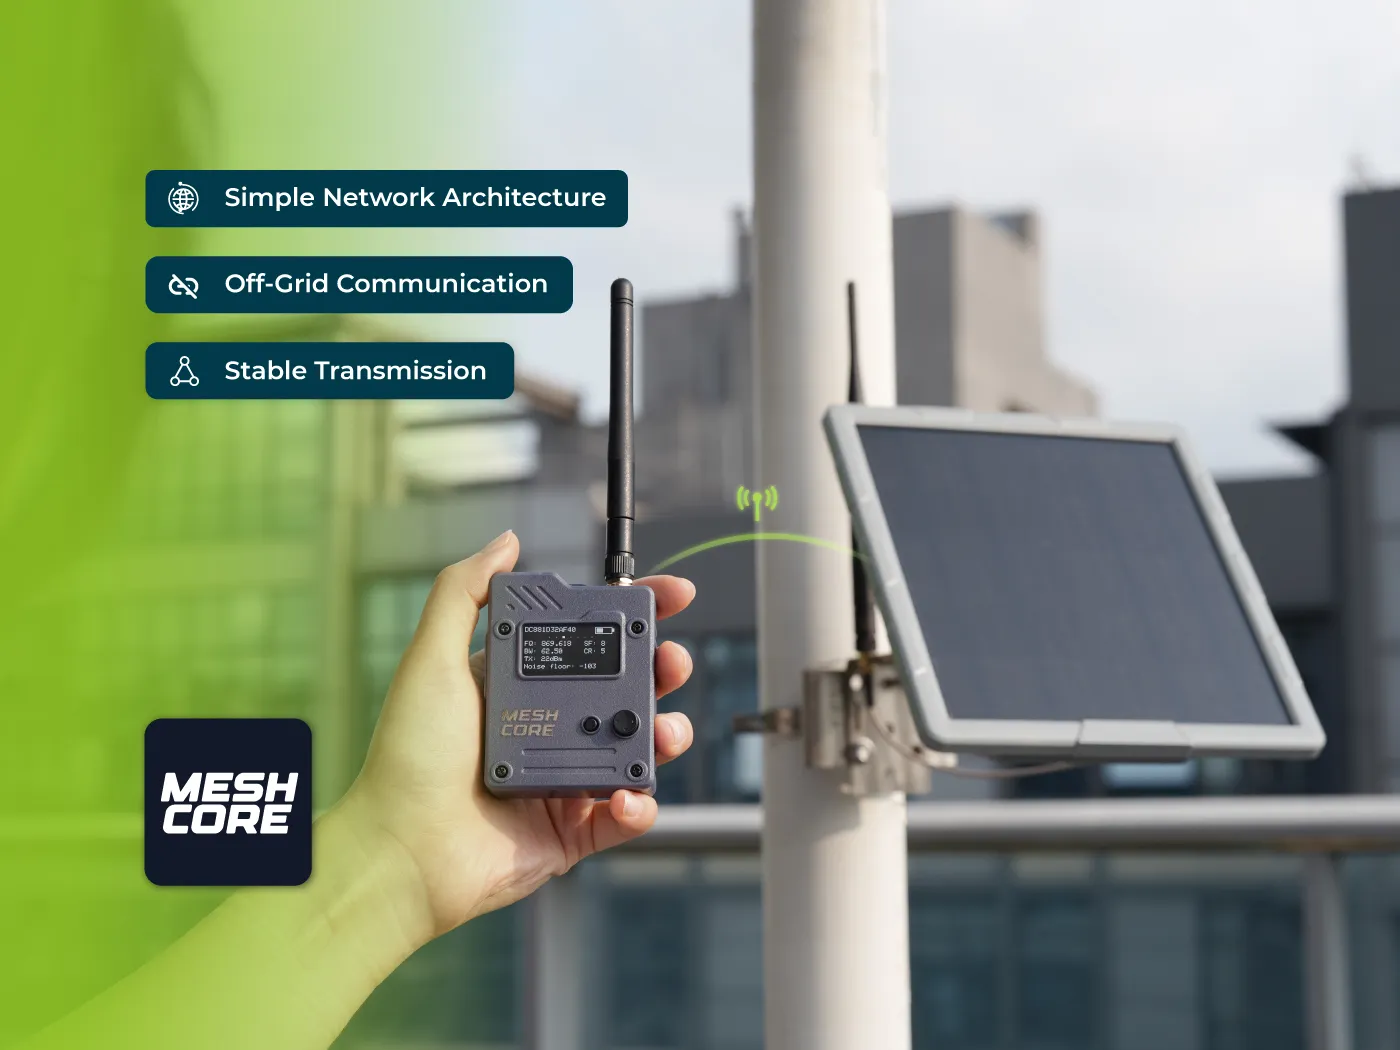
If you’ve ever tried to get a friend onto your mesh and watched them stall out on “which board do I buy, what antenna do I need, do I need a soldering iron, how do I flash this thing,” this kit is the answer to most of those questions. One repeater. One handheld. Both pre-flashed. Both with batteries. Wire up an antenna, charge them, open the app. That’s the whole on-ramp.
We’ve been running both of these devices on our network for a while. We have not bought the bundled kit itself. We’re hoping to get one in the next few weeks for a proper unboxing and setup video for first-time users. Until then, this is what we know about each piece of the kit and how to think about the antenna decision before you click checkout.
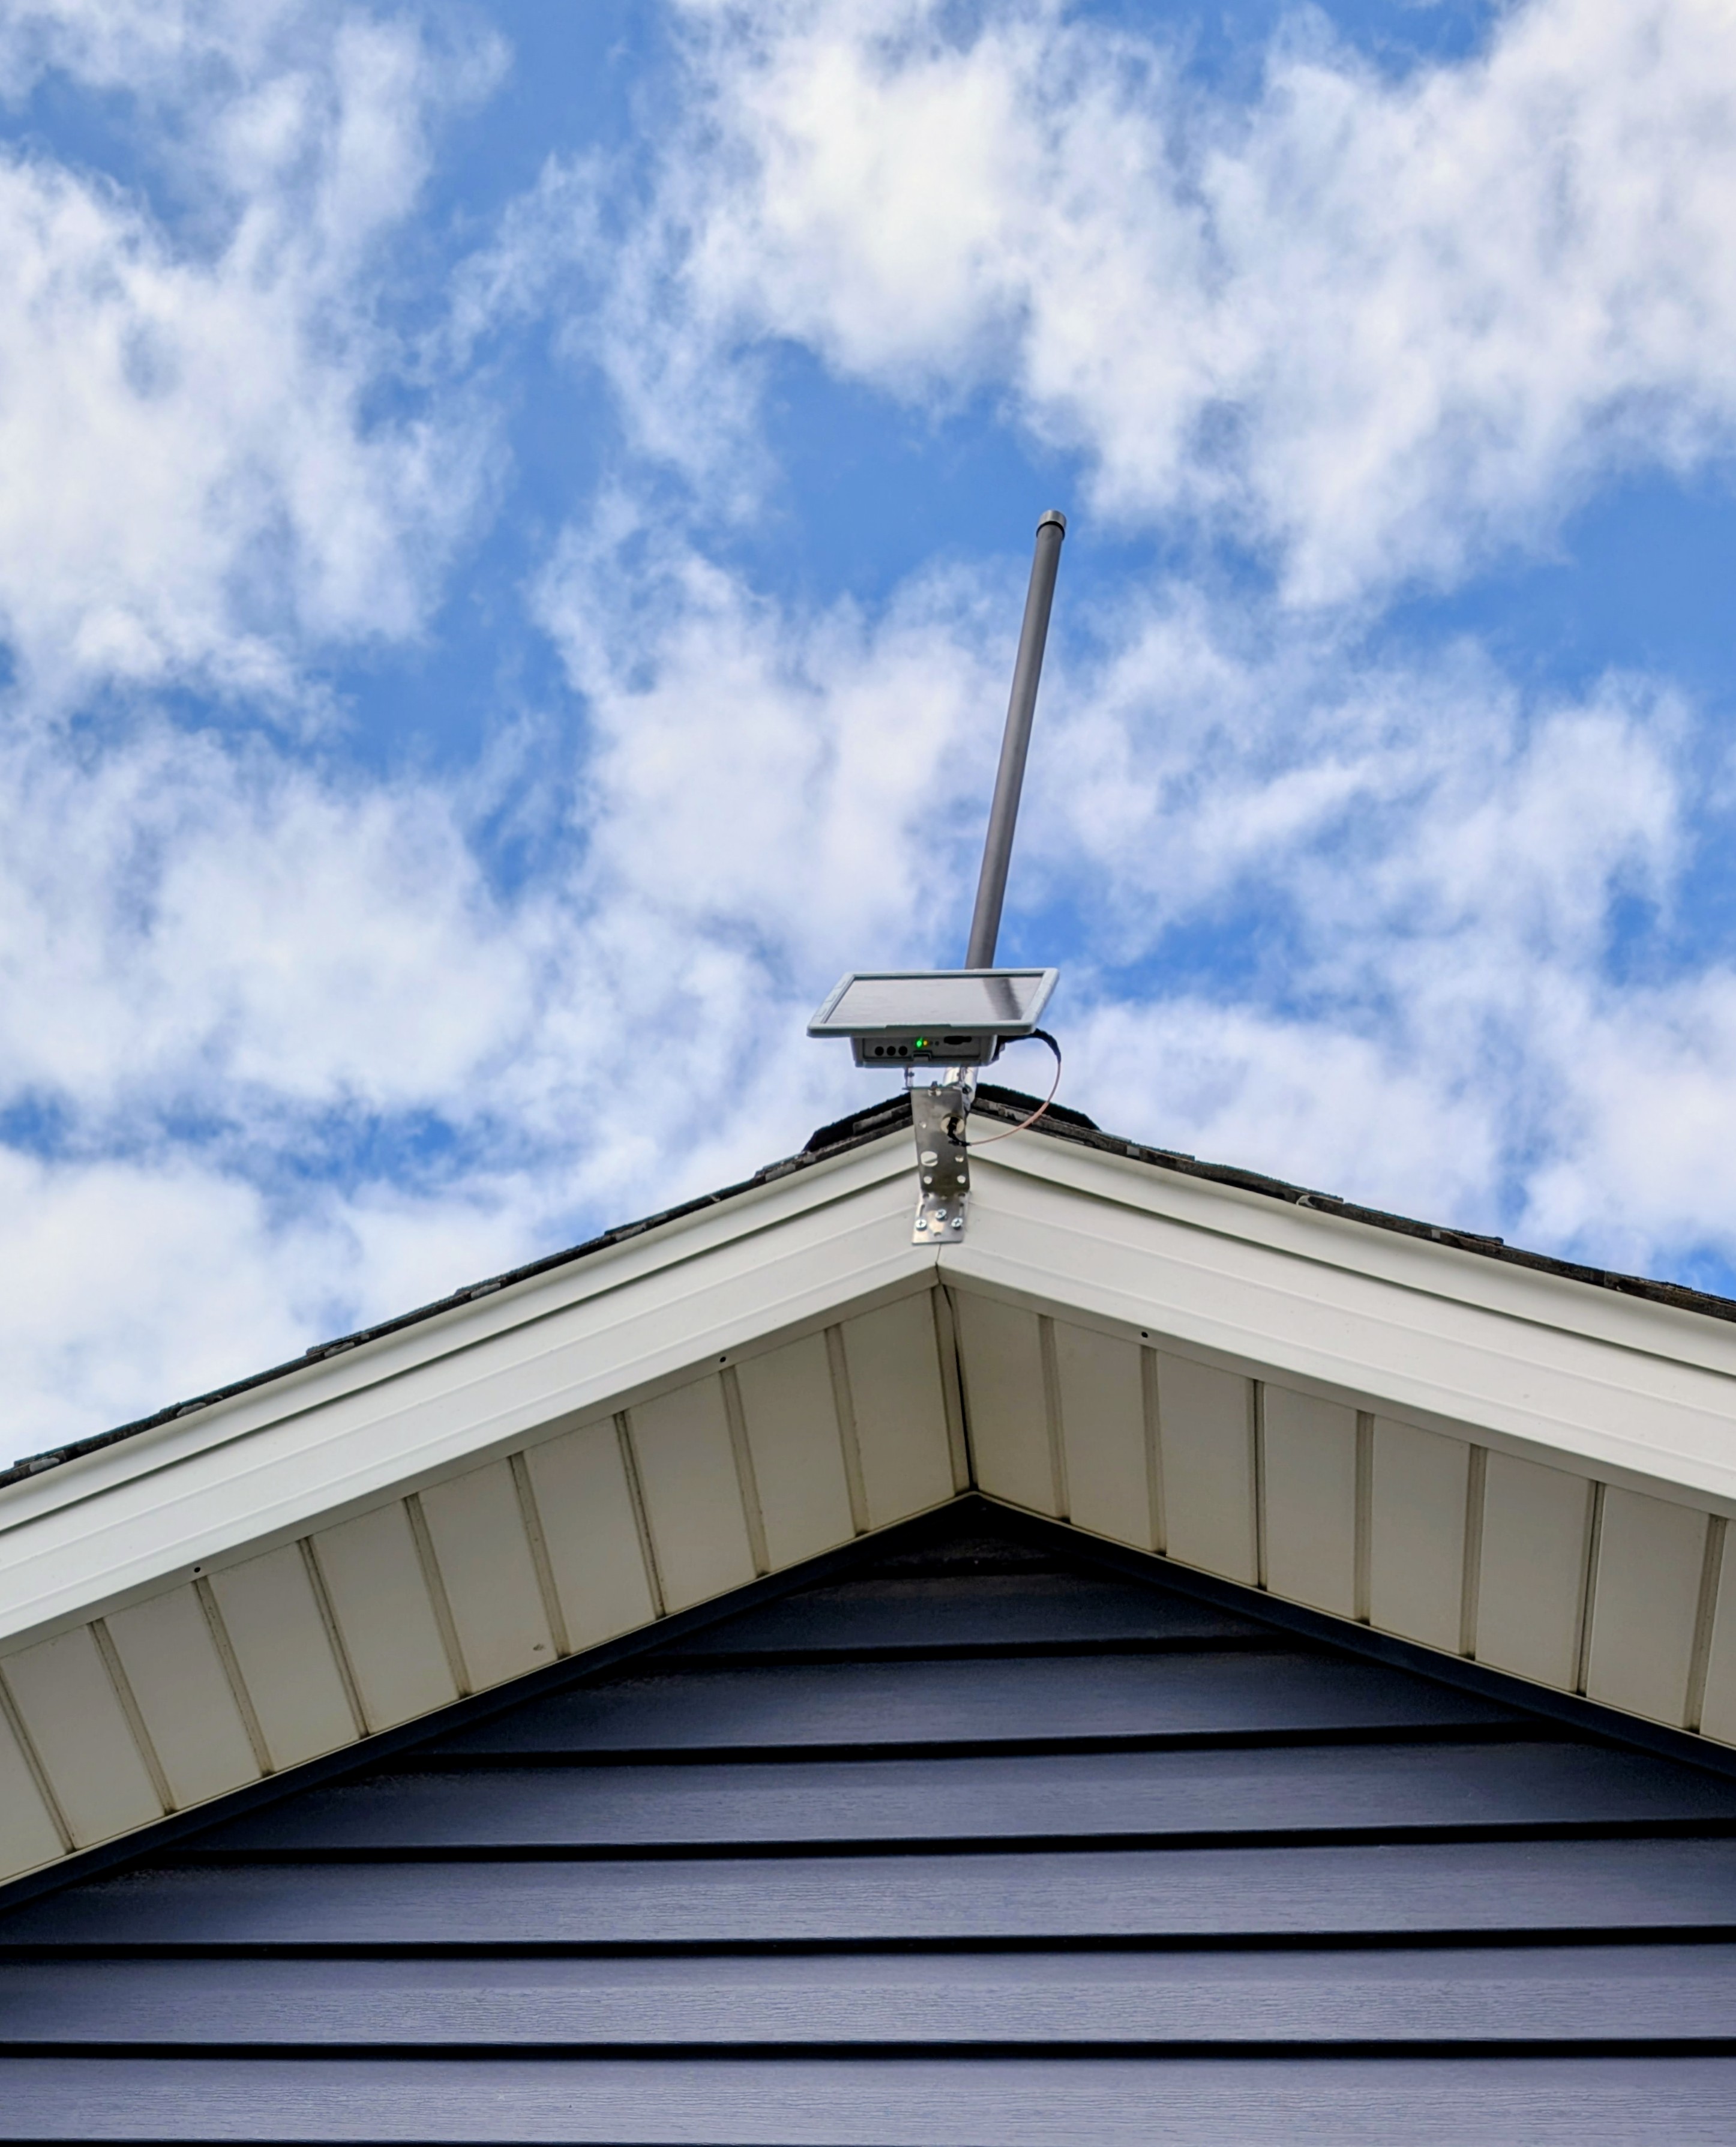
That’s our Solar Node mounted at the peak of a gable, fiberglass antenna up. The kit gets you here in an afternoon.
What’s in the Box
The MeshCore Starter Kit is everything-included for a basic two-node mesh out of the box. You don’t have to buy anything else to get on the air. The fiberglass antennas listed at the bottom of the kit page are upgrades for serious deployments, not required purchases.
The two devices in the kit:
- SenseCAP Solar Node P1-Pro (the repeater). Pre-flashed with MeshCore repeater firmware. Ships with a 2 dBi rubber rod antenna, mounting brackets, an RP-SMA pigtail, a USB-C cable, and a user manual. Sits outside, runs on solar.
- Wio Tracker L1 Pro (the companion). Pre-flashed with MeshCore Bluetooth Companion firmware. 3 dBi whip pre-attached, battery pre-installed, USB-C cable in the box. Lives in your pocket or backpack.
The included 2 dBi rubber rod on the Solar Node is enough to talk across a yard for testing. It is not enough to do useful repeating across a town. Most operators upgrade to a fiberglass antenna before they mount the Solar Node permanently. The antenna section below covers the three options Seeed sells as kit add-ons.
Seeed lists a Meshtastic-flavored version of the same bundle. Same two devices, just pre-flashed for Meshtastic instead. NodakMesh is firmware-agnostic. Both are valid choices and both run on the exact same chips, so pick the kit that matches the network you’re trying to join. If you don’t have a network in mind yet, our protocols comparison is the right place to start.
The Repeater: SenseCAP Solar Node P1-Pro

The Solar Node P1-Pro is the half of this kit that does the heavy lifting. It’s a sealed enclosure with an integrated 5 W solar panel on the lid, a Seeed XIAO nRF52840 Plus module inside, a Wio-SX1262 LoRa module pushing 22 dBm (about 158 mW) at 862 to 930 MHz, and four 3350 mAh 18650 cells in the battery compartment. The Pro version ships with the batteries already installed. The base P1 ships empty and you supply your own.
The Pro version also includes the XIAO L76K GPS module out of the box. The base P1 doesn’t. For a repeater, GPS isn’t strictly required, but it’s useful for naming nodes by location, for path-loss analysis later, and for any operator who wants to see where a node actually lives on a map.
The antenna connector is RP-SMA, and the box includes a 2 dBi rubber rod plus an RP-SMA pigtail cable. The rod is fine for desk testing, but it is not what you want bolted to a hilltop. More on that in a minute.
The dimensions are 201.2 x 191.2 x 42.1 mm. Operating temperature is rated -40 to 60 degrees C on discharge and 0 to 50 degrees C on charge. For most of North America, that’s enough cold tolerance to leave it deployed year-round.
The Companion: Wio Tracker L1 Pro
![]()
The Wio Tracker L1 Pro is the part you actually use. It’s the only Wio variant that ships fully assembled in its 3D-printed enclosure with a battery pre-installed. The L1 Lite and the bare L1 are development boards. The L1 Pro is the consumer-ready handheld.
Inside is the same Nordic nRF52840 as the repeater (32-bit Cortex-M4F at 64 MHz, 1 MB flash, 256 KB RAM), the same Semtech SX1262 LoRa transceiver, the same L76K GPS module (covers GPS, GLONASS, BeiDou, and QZSS), and Bluetooth 5.0 for pairing to your phone. There’s a 1.3-inch OLED display (128 x 64) for showing node status, battery, and incoming messages without needing the app open.
Power-wise, the L1 Pro carries a 2000 mAh lithium battery rechargeable over USB-C or a 5 V solar input on a 2.0 mm 2-pin connector. Seeed quotes around five days on a single charge under normal usage. Real-world battery life depends on how often you transmit, how often the GPS polls, and whether you keep BLE connected to your phone constantly.
Controls are side-mounted power and reset buttons plus a 4-way joystick with a separate menu button on the front. The antenna connector is U.FL (also called IPEX), and the device ships with a 3 dBi whip already attached. Dimensions are 181 x 56 x 26 mm including the antenna. It’s pocketable, but it’s not a credit card. Think more along the lines of a small handheld GPS than a smartphone.
The Antenna Decision
The biggest performance decision a new buyer makes after picking the kit is whether to keep the included 2 dBi rubber rod or upgrade. For a desk test or a “let’s see if this works” weekend, the rubber rod is fine. For a permanent rooftop or fence-mast install, it is not. Seeed’s blog and the broader MeshCore community converge on the same advice: if you’re putting this thing on a roof, upgrade the antenna.
Seeed sells three fiberglass options at the bottom of the kit listing. All three use the same RP-SMA connection the Solar Node already has. Here’s the use case for each, in plain terms.

This is what the upgrade looks like in practice: a fiberglass antenna already torqued onto the Solar Node, a roof bracket held in place, a drill, and a partner. Plan a Saturday for it. Walk-test the spot first, then mount.
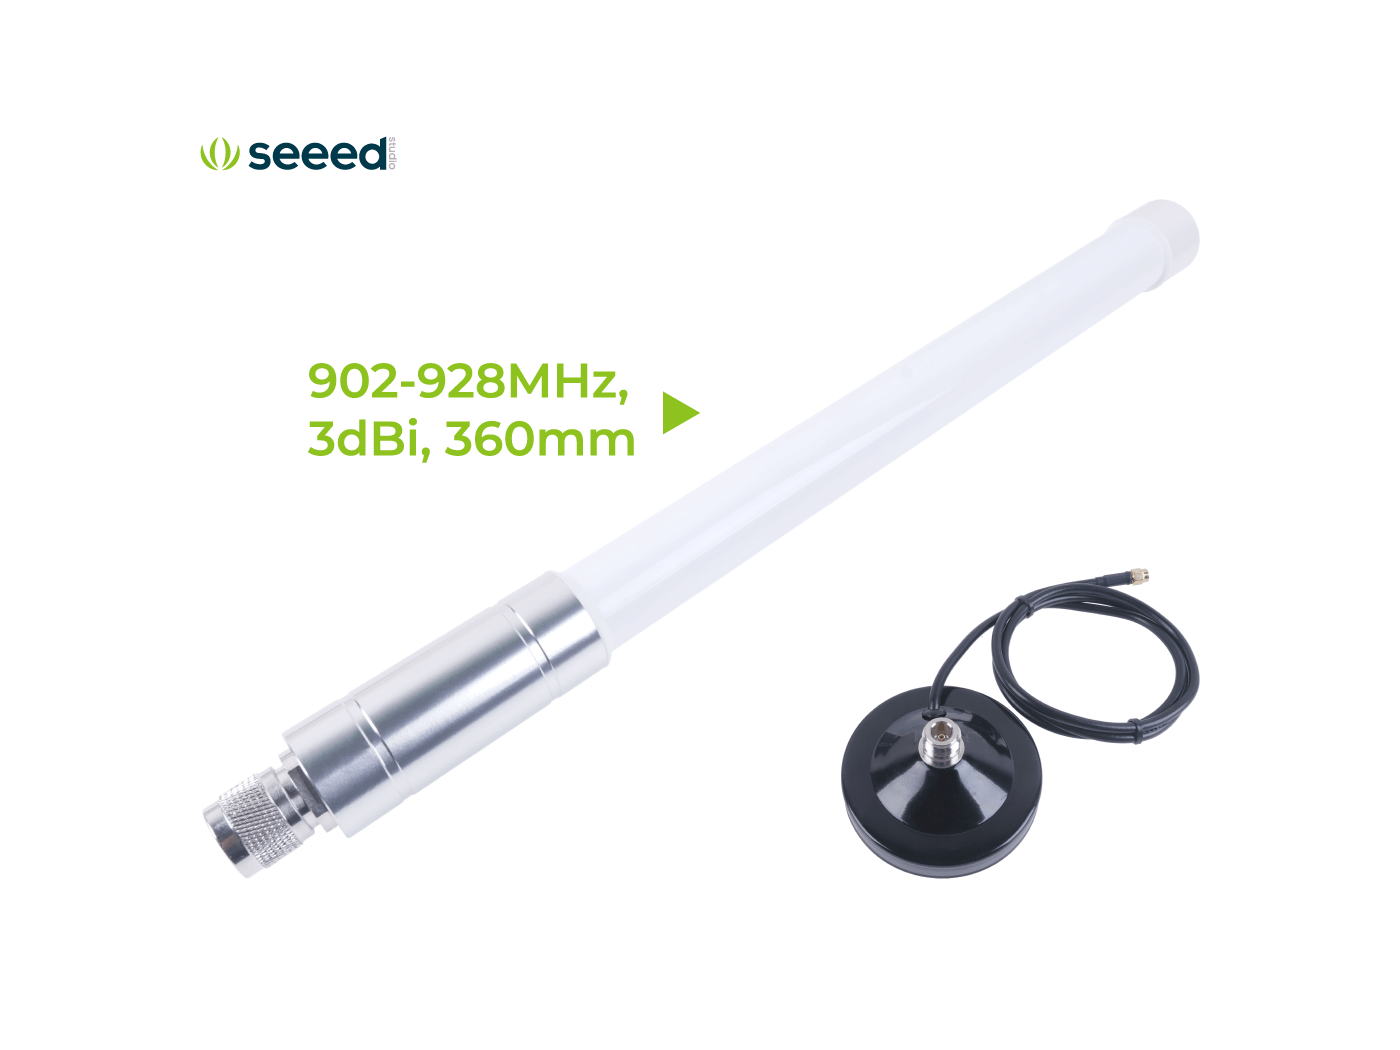
3 dBi fiberglass with magnetic base, 360 mm, $29.90. The 360 mm length and the included magnetic puck make this the easy “set on a metal surface, run the cable down to the radio” option. No drilling, no mast, no permanent commitment. Modest gain that’s still a clear step up from the stock rubber rod.
- Best for: A renter who can’t drill into a roof. Anyone testing two or three candidate locations before committing. A first repeater on top of a metal A/C unit, refrigerator vent stack, or balcony rail.
- Skip it if: You already know where the repeater is going to live permanently and you have a mast or pole available. The 5.8 dBi gives you more gain for less money in that case.
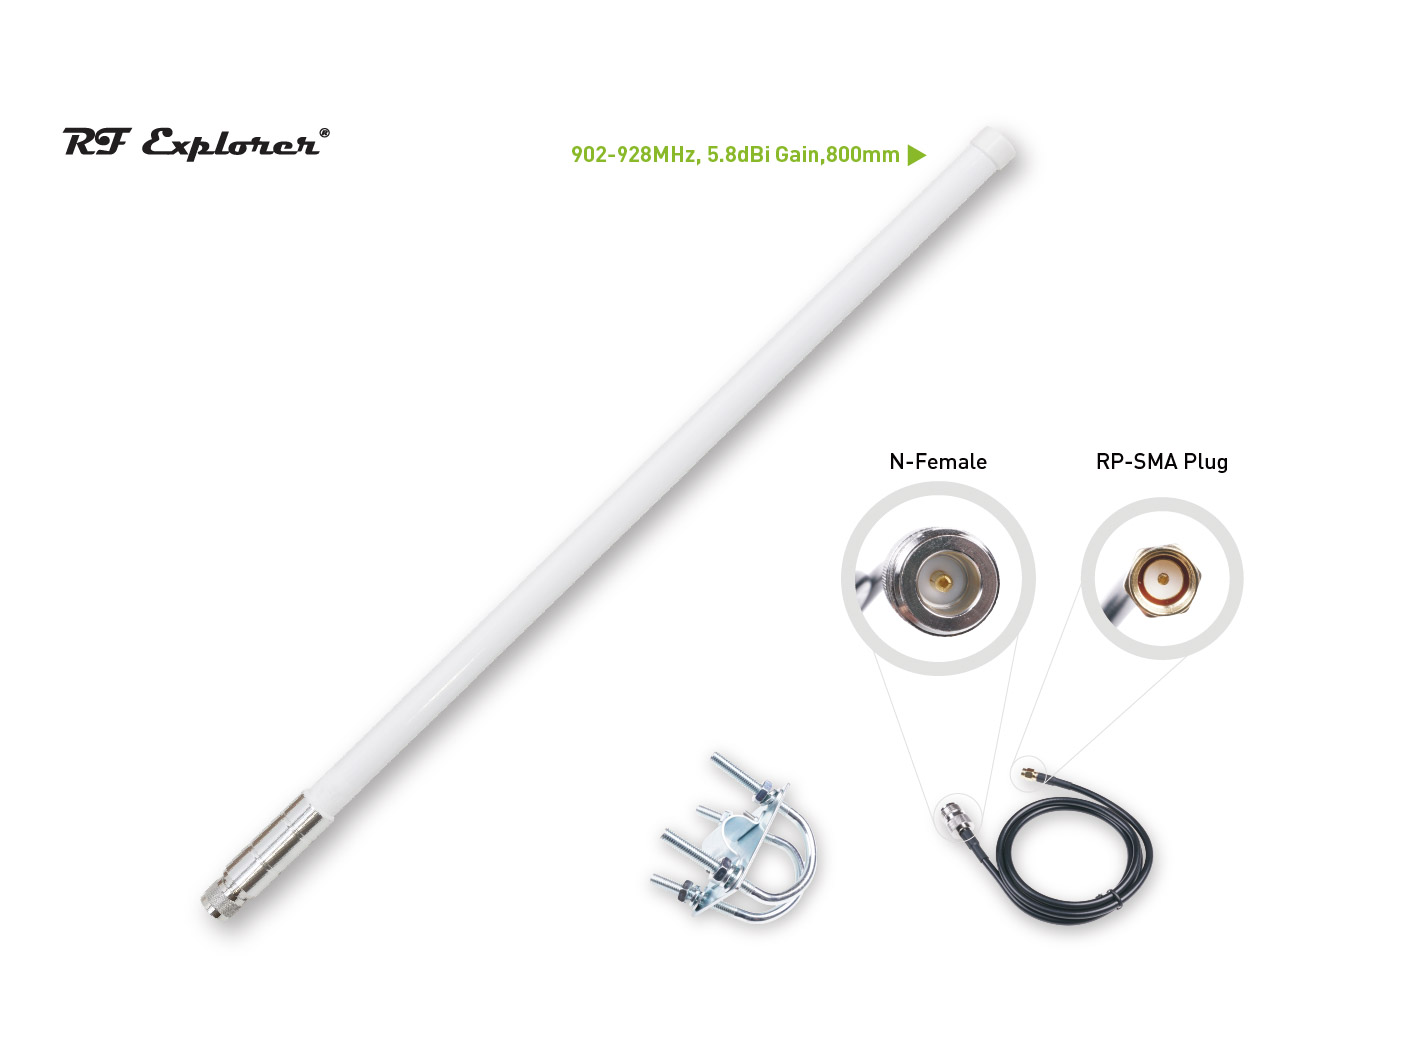
5.8 dBi RF Explorer fiberglass with U-bolt mount, 800 mm, $9.90. The price-to-performance sweet spot. Higher gain than the 3 dBi without narrowing the vertical beamwidth so much that you lose nodes sitting above or below the antenna. The U-bolt mount works on a mast, a fence rail, or a chimney bracket. Pigtail is N-female at the antenna and RP-SMA at the radio.
- Best for: The default upgrade for almost every operator. Permanent rooftop or fence-mast install in suburban or mixed terrain where some neighbors are higher than you and some are lower. First permanent repeater for a new operator.
- Skip it if: You’re on a 50 ft tower or a hilltop with no nearby high-elevation nodes. The 8 dBi will reach further at that geometry. Or if you only need to cover a single yard, in which case the 3 dBi is fine.

8 dBi RF Explorer fiberglass with U-bolt mount, 1300 mm, $29.90. The high-gain option. 8 dBi narrows the vertical beamwidth, which means the antenna sends more energy out toward the horizon and less toward the sky and the ground directly below. On a tall, clear site, that tradeoff is exactly right. On a short pole in a hilly neighborhood, the narrower beam can miss nodes that the 5.8 dBi would have caught.
- Best for: A repeater on a tower, a tall mast, a roof at the high point of a town, or a hilltop. Rural deployments where the goal is reaching the next operator 5 to 10 km away on flat-ish terrain. Anywhere you have line-of-sight to most of your network.
- Skip it if: Your install height is under about 20 ft, your terrain has hills, or your neighbors live at noticeably different elevations than you. The narrower beam will work against you.
If you’re not sure which fits your situation, we have a broader MeshCore antenna guide that covers placement, SWR testing, and antenna types beyond Seeed’s catalog. Quick summary table for this kit:
| Antenna | Gain | Length | Best for |
|---|---|---|---|
| Included rubber rod | 2 dBi | ~70 mm | Bench testing, weekend trial |
| Fiberglass with magnetic base | 3 dBi | 360 mm | No-drill rooftop, renters, scouting locations |
| RF Explorer fiberglass | 5.8 dBi | 800 mm | The default repeater pick for most operators |
| RF Explorer fiberglass | 8 dBi | 1300 mm | Towers, tall masts, hilltops, rural line-of-sight |
The L1 Pro is the easy half of the antenna story: it ships with a 3 dBi whip already attached on a U.FL connector, and most users will never change it. If you do want a different antenna on the handheld, an SMA-to-U.FL pigtail and a small portable antenna is the path. For the vast majority of users, the stock whip is fine.
Full Specs at a Glance
| Spec | Solar Node P1-Pro | Wio Tracker L1 Pro |
|---|---|---|
| MCU | XIAO nRF52840 Plus | Nordic nRF52840 |
| LoRa Chip | Wio-SX1262 | SX1262 |
| Max TX Power | 22 dBm (~158 mW) | Not separately published |
| Frequency | 862 to 930 MHz | 862 to 930 MHz |
| GPS | XIAO L76K (Pro only) | L76K (GPS, GLONASS, BeiDou, QZSS) |
| Bluetooth | BLE 5.0 | BLE 5.0 |
| Display | None | 1.3” OLED (128 x 64) |
| Battery | 4 x 18650, 3350 mAh each (included) | 2000 mAh Li-ion (included) |
| Solar | Integrated 5 W panel | 5 V solar input |
| Antenna Connector | RP-SMA | U.FL / IPEX |
| Stock Antenna | 2 dBi rubber rod (included) | 3 dBi whip pre-attached |
| Enclosure | Sealed plastic with rubber port covers | 3D-printed |
| Dimensions | 201.2 x 191.2 x 42.1 mm | 181 x 56 x 26 mm |
| Operating Temp | -40 to 60 C (discharge) | Not published |
| Default Firmware (this kit) | MeshCore Repeater | MeshCore Bluetooth Companion |
| Price (standalone) | $89.90 | $42.90 |
What to Get Right Before You Mount It
The kit ships preflashed, so the click-by-click “open the app, pair the L1 Pro, hit Connect on the web config” walkthrough lives in Seeed’s setup blog, where they have screenshots of the actual flow. This section is the operator layer on top of that: the decisions you’ll make as you go, why each one matters, and what good looks like. Read both side by side the first time you set the kit up.
Region matters more than anything else. Both devices ship covering 862 to 930 MHz, but you have to tell the firmware which region you live in so it stays inside legal frequencies and duty cycles. North America is US (902 to 928 MHz, 100% duty cycle). Most of Europe is EU_868 (869.4 to 869.65 MHz, 10% hourly duty cycle on a rolling one-hour window). Region must be set in firmware regardless of which SKU you bought. Get this wrong and you’re either operating illegally or you can’t hear the mesh around you. You can change region later, but every neighbor your node has already discovered falls out of the routing table when you do, so set it right the first time before you start talking.
Change the default admin password before the repeater leaves your desk. The Solar Node’s default admin password is password. Anyone within radio range can issue admin commands to a repeater that’s still on the default, including turning it off, renaming it, or rewriting its config. Pick a long random string, save it somewhere that isn’t the repeater itself, and verify it took before you keep going. This is the one place where being lazy can cost you the whole deployment.
Name your nodes for the operator and the location. The repeater’s name shows up on every other operator’s screen when they’re routing through you. “Roof at 5th and Main” tells your neighbors something useful about coverage. “Repeater01” tells them nothing. Same logic on the L1 Pro: pick a callsign, a handle, or a place that means something on someone else’s map.
Match channels with your neighbors before you announce yourself. A MeshCore channel is a frequency slot plus a shared key. Two nodes on the same channel can hear each other. Two nodes on different channels can sit a meter apart and never connect. If there’s an active mesh in your area, ask the operators which channel they’re on and add it to both devices. If you’re the first repeater for miles, use the default public channel and announce yourself in the regional Discord or forum so the next operator finds you fast.
Tune advert intervals to match local convention. MeshCore repeaters send two kinds of “I’m here” beacons. Zero-hop adverts are heard only by direct neighbors. Flood adverts get propagated across the whole mesh. Frequent adverts mean faster discovery and more accurate routing tables. Sparse adverts save airtime so other nodes can actually send messages. For a permanent solar repeater, sane defaults sit in the middle of the configurable range: frequent enough that the mesh knows about you within an hour, sparse enough that the channel doesn’t fill with beacons. If your local mesh has agreed on a convention, match it. If you’re the only repeater in the area, lean slightly more frequent on flood adverts so newcomers find you faster.
Turn off GPS on the repeater, leave it on for the L1 Pro. The Solar Node P1-Pro includes a GPS module. For a fixed repeater, polling GPS continuously costs battery for no useful information, since the location doesn’t change. Set a manual latitude and longitude once if you want the node to show up on other operators’ maps, then disable the GPS poll. Turn it back on temporarily if you ever move the node or you want to confirm a deployment site’s coordinates. The L1 Pro is the opposite: leave its GPS on. That’s half the point of carrying it.
Walk-test placement before you screw anything to a roof. Walk the area with the L1 Pro while the Solar Node sits at your candidate spot. The OLED on the L1 Pro shows RSSI and SNR live for the last received packet, so you can map your real coverage from the locations you actually care about. SNR above -7 dB and RSSI above -110 dBm is healthy. SNR below -10 dB or RSSI below -115 dBm is the edge of usable signal. If your worst-case spots are still in the healthy zone, the repeater location is good. If they’re not, raise the repeater, change the antenna, or pick a different site before you commit to a permanent mount.
Verify one full round trip before you walk away. Once the repeater is at its final spot and you’re somewhere the L1 Pro has to actually use it, send one message you know will need to relay. Watch the hop count on the response. One hop means a direct shot. Two hops means your message bounced through your repeater (or someone else’s). That single confirmed round trip is the line between “I have a working mesh” and “I have two pieces of hardware that look like a mesh.”
How It Compares to the Meshtastic Path
Seeed sells the same two physical devices preflashed for Meshtastic, but the Meshtastic-flavored offering is structured differently. The MeshCore kit is a fixed combo at $132.80. The Meshtastic version is a configurable bundle whose default companion is Seeed’s smaller Card Tracker T1000-E ($39.90), with the Wio Tracker L1 Pro and Solar Node P1-Pro available as upgrade SKUs at $46.99 and $95.99 respectively. Same chips on both sides. Different bundle structure, different total.
| MeshCore Starter Kit | Meshtastic Starter Kit | |
|---|---|---|
| Bundle structure | Fixed two-device combo | Configurable |
| Default companion | Wio Tracker L1 Pro | Card Tracker T1000-E |
| Repeater option | Solar Node P1-Pro (preflashed for MeshCore) | Solar Node P1-Pro (preflashed for Meshtastic) |
| Companion firmware | MeshCore Bluetooth Companion | Meshtastic |
| Mobile app | MeshCore (Android, iOS) | Meshtastic (Android, iOS) |
| Network compatibility | Other MeshCore nodes | Other Meshtastic nodes |
| Fixed combo price | $132.80 | Not offered as a fixed combo |
The choice is almost entirely about which network you’re joining. MeshCore is newer, more efficient with airtime in dense networks, and growing fast in regions where operators have moved to more disciplined repeater management. Meshtastic is older, has a larger installed base in most cities, and a more mature mobile app ecosystem. If you’re joining an existing local mesh, ask which protocol that mesh runs and buy the matching path. If you’re starting from scratch with no neighbors in radio range yet, either is fine. Both physical devices can be re-flashed to the other firmware later, since the underlying hardware is identical.
If you’re already running MeshCore and you want a second site repeater, the MeshCore kit at $132.80 is the cleanest path. If you’re running Meshtastic and you want a solar friend, build the equivalent on Seeed’s Meshtastic kit page by selecting the L1 Pro as your companion and the Solar Node P1-Pro as your repeater. The total comes out higher because those SKUs are priced separately, but you get the same hardware running your existing protocol.
Who This Kit Is For
If you’re brand new to mesh and you don’t want to buy seven things from four vendors and assemble a node from parts, this is the cleanest entry point we’ve seen at the price. Two devices, both pre-flashed, both with batteries, both ready to charge and use. Add an antenna and you have a real two-node mesh.
If you’re an experienced operator who already has a tracker and just needs a solar repeater, the bundle is still cheaper than buying the Solar Node P1-Pro alone at $89.90. Buy the kit, hand the L1 Pro to a friend who’s been asking about mesh, and you’ve onboarded a new operator while saving on the repeater.
If you want to build from parts, learn solar power management, or use a specific battery chemistry, our solar repeater build guide is a better path. The kit’s value is in the lack of decisions you have to make, which is exactly the wrong tradeoff if you want to make the decisions.
We carry both devices on our MeshCore devices page if you want to read more about each one before you buy.
We’re hoping to get a kit in hand soon and produce an unboxing and first-mesh setup video to go with it. The goal is something a brand-new mesher can follow start to finish in a single afternoon. If you’ve got the kit already and you want to share what tripped you up during setup, we’d love to hear about it on Discord.
You can find the MeshCore Starter Kit on Seeed, or build the same hardware on the Meshtastic Starter Kit page by selecting the L1 Pro and Solar Node P1-Pro options.
Small print: prices were accurate at the time of writing. Seeed runs sales, adjusts list prices, and rotates coupon programs on their own schedule. Confirm the current price at checkout before you buy. NodakMesh is a Seeed Studio affiliate; full partnership disclosure here.
Comments
Related Posts

MeshCore Path Hash Modes Explained: 1, 2, and 3 Byte
How MeshCore's 1, 2, and 3 byte path hashes work, why 1-byte collides at scale, and when to switch. Guide to path.hash.mode for growing meshes.

Meshtastic Range Test: Map Your Mesh Coverage
Measure and map Meshtastic coverage with the range test module, trace route, signal metrics, and MeshMapper. Field tips for flat-plains deployments.

Meshtastic MQTT Setup: Bridge Your Mesh to the Internet
Set up MQTT on Meshtastic to bridge your LoRa mesh to the internet. Uplink/downlink, public vs self-hosted broker, Home Assistant, Grafana.