RAK WisMesh Station HP: First Look at a Pi 4 Mesh Node
RAK's WisMesh Station HP puts a Raspberry Pi 4, a WisBlock HAT, and a 1-watt-class SX1262 in a finned aluminium case. Hardware tour and what it runs.
RAKwireless put a Raspberry Pi in a heatsink and called it a mesh node. The WisMesh Station HP is a Pi 4 Model B, a RAK6421 WisBlock HAT, a GNSS module, and a 1-watt-class RAK13302 LoRa radio, bolted into a finned aluminium case with a 32 GB card that boots into meshtasticd. It’s $175.99 direct from RAK, or $189.97 through Rokland. The standard-power RAK8622 drops to a 22 dBm radio for $169.99.
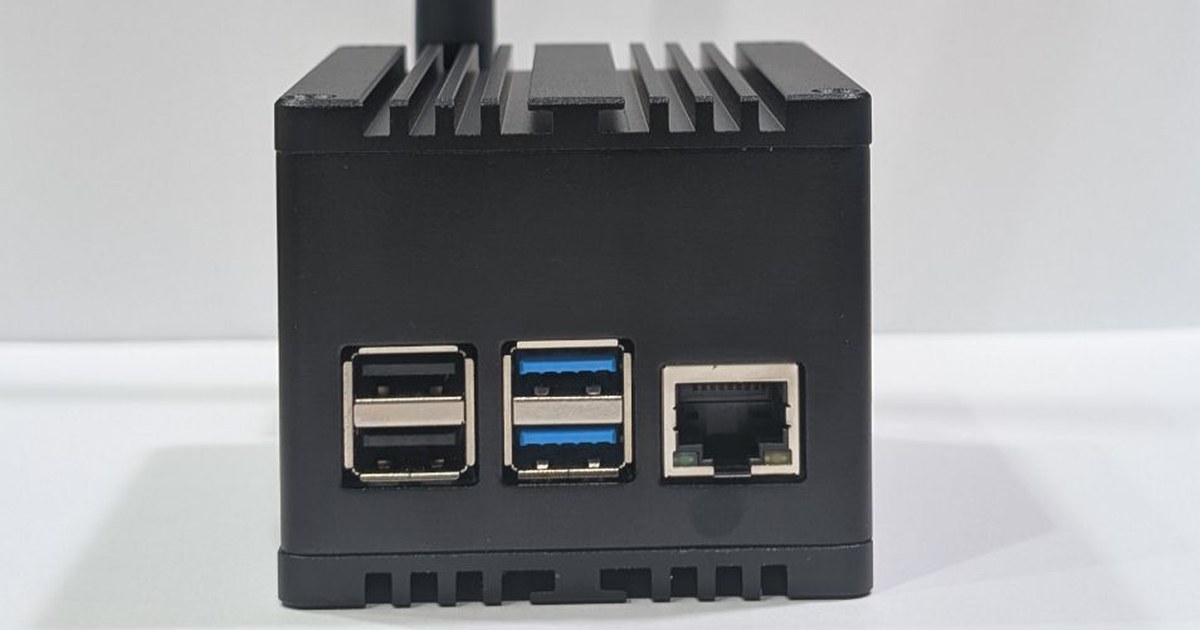
This is a first look at the hardware. RAKwireless sent us the unit, the arrangement is photographs and a post, they set no conditions on what it says and didn’t see it before publication. It has been on the bench for a few days and it is running on our mesh, but nothing here is a measurement. Performance, where this thing actually earns its place, and a proper look at the software side all belong to the review, once it has more time on the network.
What follows is what the hardware actually is, and a short tour of what it will run.
What’s in the Box
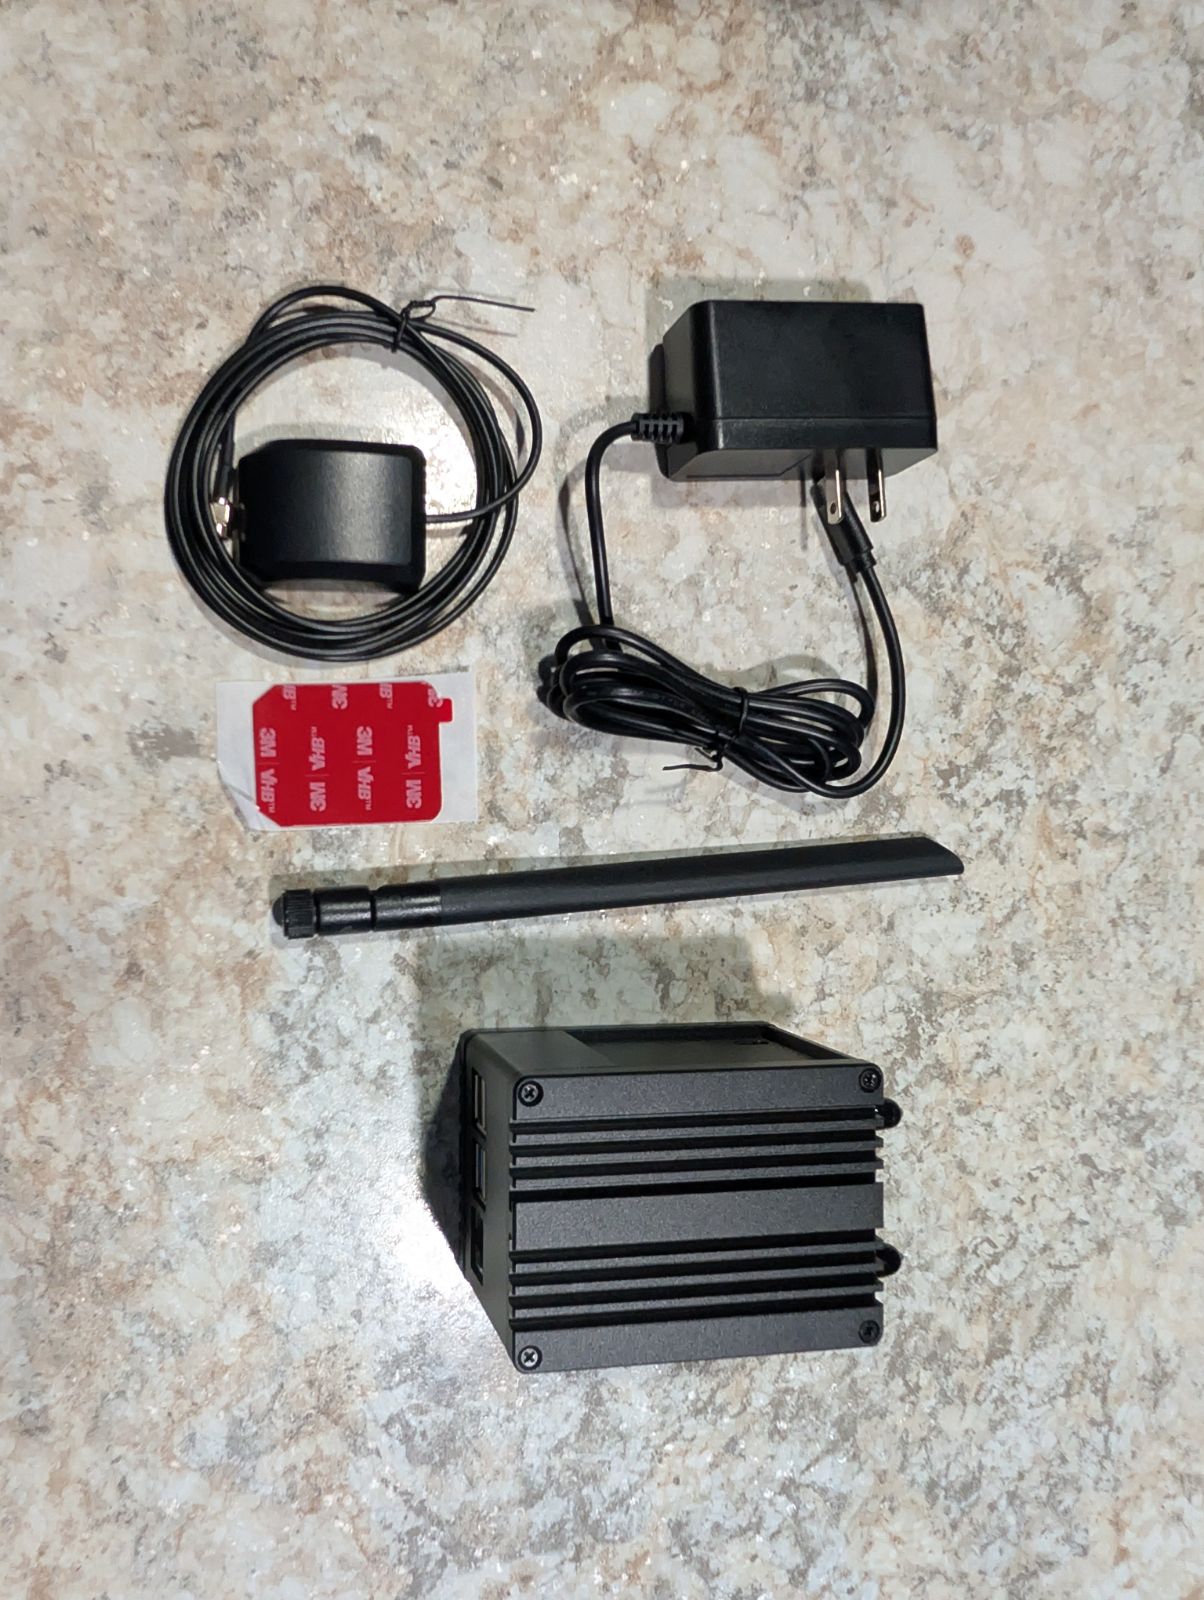
Unit, LoRa whip, GPS antenna, power supply, and the 32 GB microSD card. The GPS antenna is the detail worth noticing: it’s a puck on a long cable with a 3M VHB pad on the back, not a stub that screws to the case. That is the right call for a device meant to sit on a shelf indoors, because it lets the antenna go to a window while the node stays where the Ethernet is.
The supply is a plain wall wart. RAK’s label asks for 5 V at 3 A, which is a Raspberry Pi 4 number before you add a power amplifier to it.
The Outside
The case is extruded aluminium with fins top and bottom, four screws per end cap, and a textured black finish. It is a heatsink that happens to be an enclosure. There is no fan and no vent, which is the correct approach for a sealed indoor box.
One face is pure Raspberry Pi: two USB 2.0 ports, two USB 3.0 ports, and gigabit Ethernet.
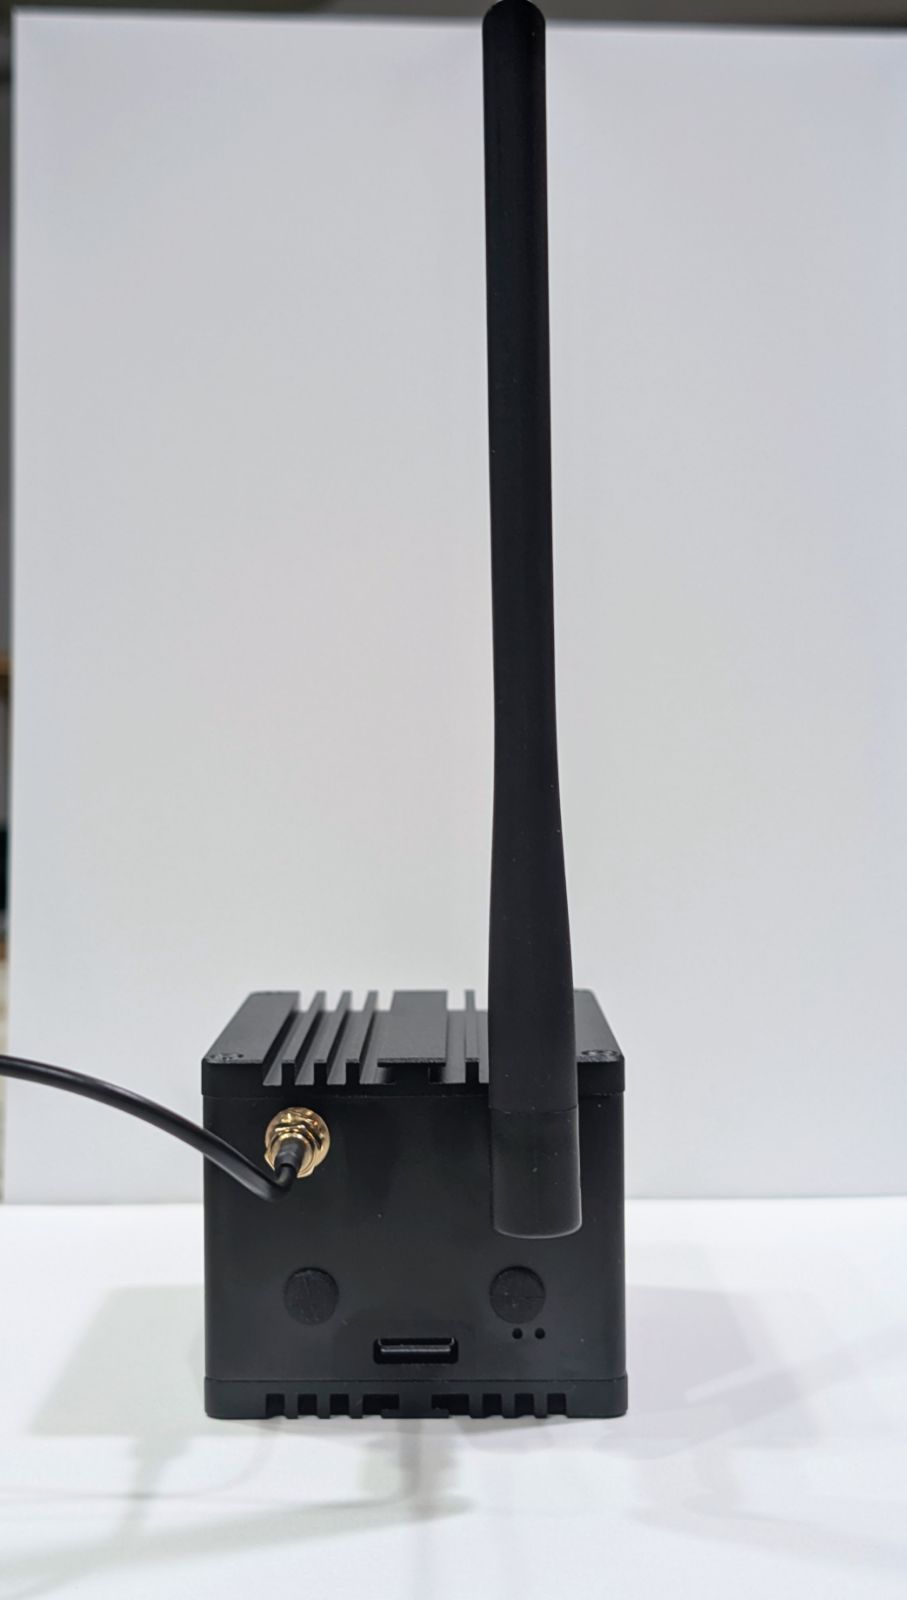
The other face carries the RF and the power: the LoRa antenna connector, the GPS antenna connector with the puck’s cable running off to the left, USB-C for power, and two status LEDs. RAK publishes these as RP-SMA for LoRa and SMA for GPS, which is worth knowing before you order an antenna.
Those four USB ports matter more than they look. They are how this box picks up a second radio, which is the whole capabilities story further down.
Connect the antenna before you apply power. That applies to every high-power LoRa device and RAK says it too.
What RAK Actually Shipped Us
Here is where a first look earns its keep, because the unit disagreed with itself.
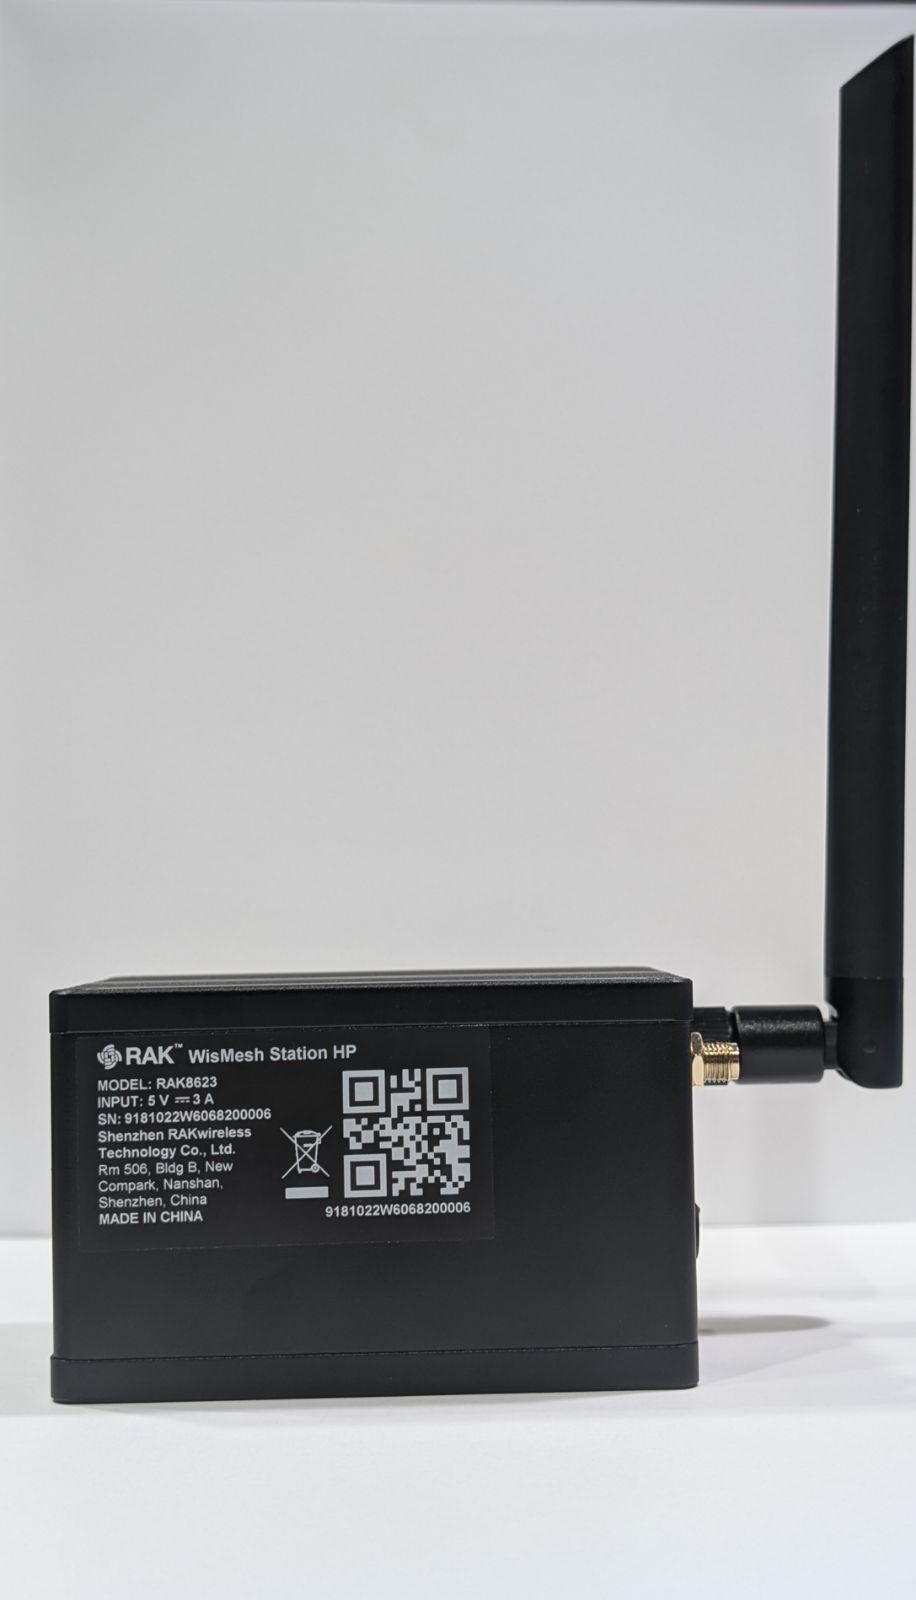
The label on the case says RAK8623, WisMesh Station HP, 5 V at 3 A. That is the high-power SKU, the one with the amplified radio.
The HAT disagreed. The RAK6421 is HAT+ compliant, so its onboard EEPROM carries RAK’s own factory inventory of the board, and the Pi exposes it in the device tree without a screwdriver:
$ tr -d "\0" < /proc/device-tree/hat/product
6421 Pi Hat
$ tr -d "\0" < /proc/device-tree/hat/custom_1
io_slot1 RAK13300
$ tr -d "\0" < /proc/device-tree/hat/custom_3
sensor_slot_a RAK12501
RAK13300 is the standard 22 dBm module, not the amplified one. Two RAK records, two different answers, on the same unit.
The screwdriver settles it.
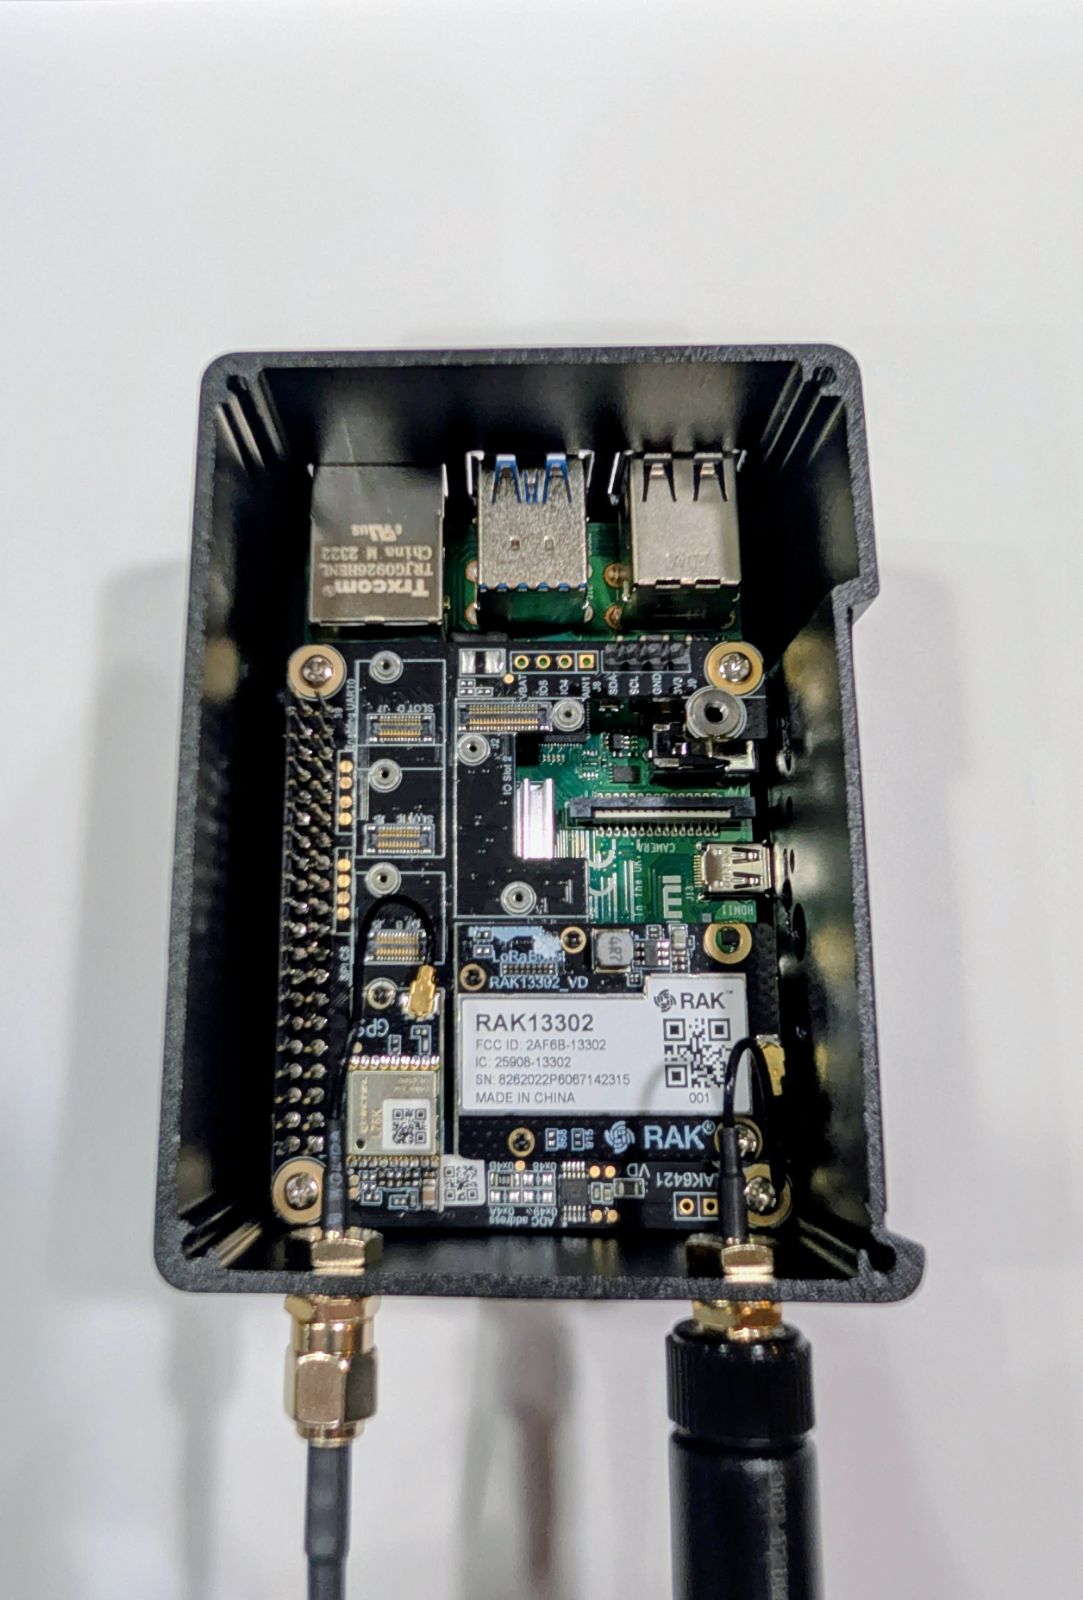
The module in IO slot 1 is labelled RAK13302, FCC ID 2AF6B-13302, and the board silkscreen underneath reads RAK13302_VD. It is the amplified part, the case label is right, and the EEPROM’s module field is a stale factory record. That is the likeliest explanation rather than a contradiction in principle: RAK programs the EEPROM at HAT level, and the module field did not get updated when a 13302 was fitted.
Worth flagging for anyone else with one of these: if you configure from the EEPROM alone, you will believe you have the 22 dBm part. Read the silkscreen.
The module label also carries a code of 001. RAK’s datasheet for the VD board revision says the module ships as two non-switchable hardware variants, 001 for battery supply and 002 for external 5 V, and 002 is the one with the 5 V connector on the underside. Ours is 001. The RAK6421 derives a VBAT rail at 4.17 V from the Pi’s 5 V, which is the obvious thing for a battery-supply variant to run from, and pairing them this way avoids needing a separate 5 V feed inside the case. We have not verified that directly.
Inside
The same photo covers the rest of the build. The HAT sits on the Pi’s 40-pin header with the LoRa module in IO slot 1 and the RAK12501 GNSS module, a Quectel L76K, in sensor slot A. Two IPEX pigtails run from the modules out to the bulkhead connectors on the case. The HAT silkscreen is dense and useful: slot labels, the ADC address options at 0x48 through 0x4B, and the J8 and J9 breakout pads for VBAT, AIN1, GPIO 4 and 5, 3V3, ground, and I2C.
Underneath it all is an ordinary Raspberry Pi 4 Model B, Rev 1.5 on ours, with 2 GB of RAM. The camera connector and HDMI ports are still there, unused and inaccessible with the lid on.
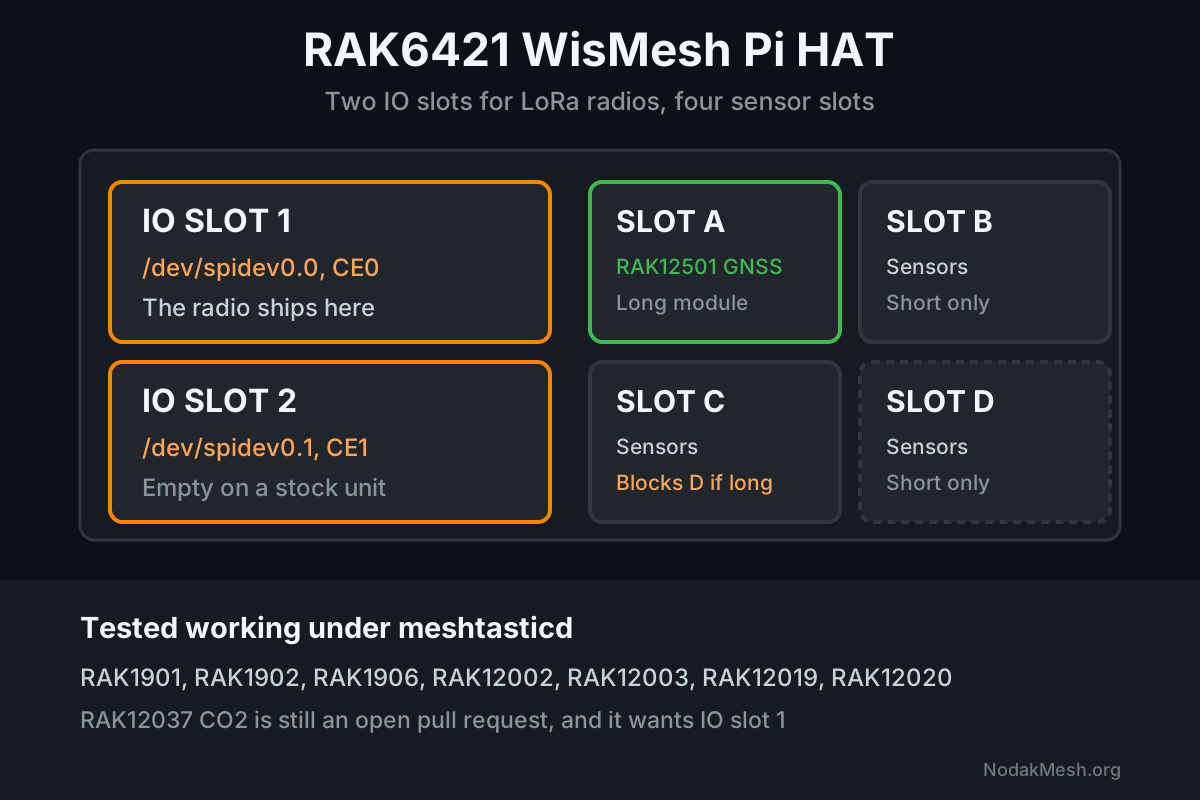
The HAT is what makes this a platform rather than an appliance. Two IO slots for LoRa radios on the SPI bus with independent chip selects, so slot 1 is /dev/spidev0.0 and slot 2 is /dev/spidev0.1. Four sensor slots, of which A and C take a long module, and a long module in C makes D unreachable. Slot 2 is empty on a stock unit.
Because the HAT is HAT+ compliant, its EEPROM supplies its own device-tree overlay. Our card is stock Raspberry Pi OS with config.txt untouched and dtparam=spi=on still commented out, and both spidev nodes exist anyway. Worth knowing if you roll your own image and go looking for a problem you do not have.
About the 1 Watt
The RAK13302 is a Semtech SX1262 behind a Skyworks SKY66122 front end with an integrated filter stage, 902 to 928 MHz. Hardware ceiling is 30 dBm.
That is not the US operating point. The module’s grants under FCC ID 2AF6B-13302 authorize 0.2897 W as a spread spectrum transmitter and 0.2831 W as a digital transmission system, both peak conducted. Under 290 mW either way, against hardware rated for more than three times that. Rokland states units ship with compliant settings. It is still roughly 3x a typical 100 mW node, so it is not a bait and switch, but the 1 W on the box is a capability and not a permission. We went through the bandwidth rules that produce numbers like that in a separate post, because the power spectral density limit does more of the work there than the headline power figure does.
Power is the other half of that story. RAK publishes a peak current of 1000 mA at full output, dropping to 410 mA at 21 dBm. An amp of transmit peak on top of a Pi 4 that wants 3 A on its own is where the supply rating comes from, and it is why this is a mains device with no battery path.
RAK’s product copy also includes an unattributed use case about an operator going from under 2 km on handhelds to “stable 12 km links” after moving to the high-power variant. No antenna, no terrain, no method, no operator named. Elevated 900 MHz LoRa with clean line of sight does 12 km at 100 mW, so that number describes the sites rather than the amplifier. We are quoting it as vendor copy rather than repeating it as spec.
What It Runs
This is the part we are only touching here, because it is most of the review.
Out of the box it is a Meshtastic node. RAK publishes the image build, so the contents are knowable from source rather than from the store copy: on a Debian bookworm arm64 lite base it installs meshtasticd from the OpenSUSE Meshtastic alpha repository, the Meshtastic Python CLI, and Docker, then stages a MeshMonitor docker-compose file in the rak user’s home without starting it. It does not install Mosquitto, Node-RED, InfluxDB, or Grafana anywhere in the build, whatever the product pages say. Those live in a separate RAK repo as an optional installer. Meshtastic itself comes up at https://<pi-ip>:9443.
We reimaged ours, because NodakMesh is a MeshCore network.
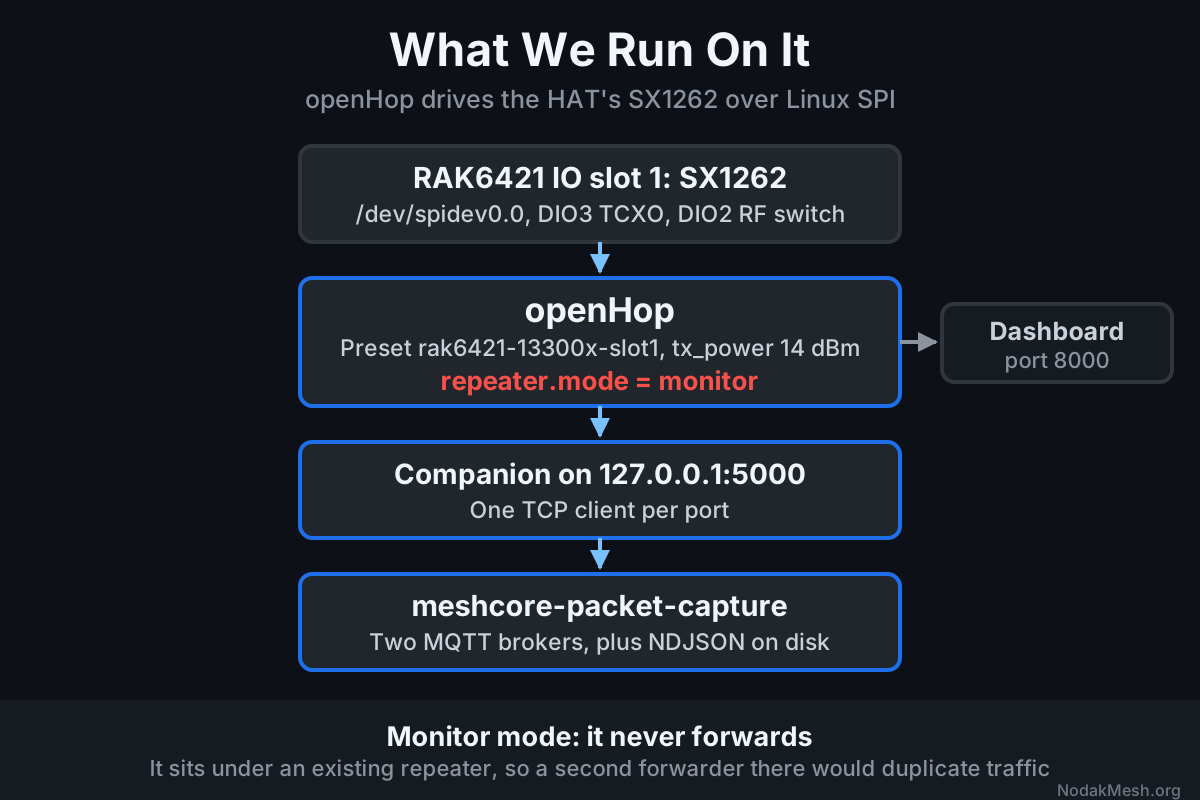
The useful finding is that the internal radio is not locked to Meshtastic. openHop, a Linux MeshCore implementation, drives an SX1262 directly through spidev and system GPIO, and it ships three RAK6421 board presets out of 27. One config file and the radio came up:
SX1262Radio configured: freq=910.5MHz, power=14dBm, sf=7, bw=62.5kHz
SPIdev opened: /dev/spidev0.0 @ 2000000Hz
DIO3 TCXO enabled: 1.8V, 5ms delay
DIO2 RF switch control enabled
SX1262 radio initialized successfully
No companion radio on a USB port, no hand-wired pin map. For anyone doing this themselves, here are both slots in BCM numbering, since this is the part you retype into a config file:
| Setting | IO slot 1 | IO slot 2 |
|---|---|---|
| SPI device | /dev/spidev0.0 | /dev/spidev0.1 |
| bus_id / cs_id | 0 / 0 | 0 / 1 |
| cs_pin | -1 (kernel-managed) | -1 (kernel-managed) |
| reset_pin | 16 | 24 |
| busy_pin | 24 | 19 |
| irq_pin | 22 | 18 |
| en_pins | 12, 13 | 26, 23 |
| use_dio2_rf | true | true |
| use_dio3_tcxo | true, 1.8 V | true, 1.8 V |
Those en_pins are load-bearing on this variant. An SX1262 sitting behind an unconfigured SKY66122 initialises cleanly and then hears almost nothing, and openHop drives those enables natively where meshtasticd has no mechanism for it.
Ours runs as a passive observer rather than a repeater, because it sits underneath an existing repeater and a second forwarder at one set of coordinates duplicates traffic and pollutes route discovery. It captures every packet with SNR and RSSI to local disk and publishes to two community MQTT brokers. That configuration, what it takes to keep it from forwarding, and the several ways it can go wrong are the review.
One thing the Pi buys you that an MCU node does not: our node is also posting NWS forecasts and severe weather alerts for the Fargo and Moorhead area to a channel, off the same box, in Python. That is a capability, not a benchmark, and we will treat it as one.
Full Specs
| Spec | Detail |
|---|---|
| Model | RAK8623 (HP) / RAK8622 (standard) |
| Platform | Raspberry Pi 4 Model B, Rev 1.5 on our unit |
| RAM | 2 GB |
| HAT | RAK6421 WisMesh Pi HAT, HAT+ compliant with ID EEPROM |
| LoRa Module | RAK13302 (SX1262 + SKY66122), board rev VD, label code 001 |
| Max TX Power | 30 dBm hardware, ~290 mW authorized in the US |
| GNSS | RAK12501 (Quectel L76K), sensor slot A |
| Expansion | 2 WisBlock IO slots, 4 sensor slots |
| SPI | /dev/spidev0.0 (slot 1), /dev/spidev0.1 (slot 2) |
| Ports | 2x USB 2.0, 2x USB 3.0, gigabit Ethernet, USB-C power |
| Storage | 32 GB microSD, removable |
| Power Input | 5 V at 3 A |
| Enclosure | Finned aluminium, no fan |
| Dimensions | 92 x 68.3 x 57.5 mm |
| Weight | 630 g |
| Operating Temp | -10 to +55 C |
| Antennas | RP-SMA for LoRa, SMA for GPS, puck on a cable |
| Firmware | Meshtastic via meshtasticd, MeshCore via openHop |
| Price | $175.99 HP, $169.99 standard |
How It Compares to the WisMesh 1W Booster Kit
The natural comparison is RAK’s own WisMesh 1W Booster Starter Kit, because it is the same RAK13302 radio with a completely different computer behind it, at a quarter of the price.
| WisMesh Station HP | WisMesh 1W Booster Kit | |
|---|---|---|
| Host | Raspberry Pi 4B, 2 GB, Linux | nRF52840 (RAK3401 core) |
| LoRa Module | RAK13302 | RAK13302 |
| Max TX Power | 30 dBm hardware, ~290 mW FCC | 30 dBm hardware, ~290 mW FCC |
| GNSS | RAK12501 included | Not included |
| Battery / Solar | None, mains only | Li-Ion connector and solar input |
| Enclosure | Aluminium, included | None |
| Remote Access | SSH, dashboards, local capture | BLE to a phone |
| Price | $175.99 | $39 |
The radio chain is identical, so this is not an RF comparison. The Booster kit runs off a battery and a solar panel and the Station cannot, which rules the Station out of every hilltop and fence post. What the Station gives back is a computer: SSH into a misbehaving node instead of driving to it, package updates instead of reflashing, and a local broker and capture file so your telemetry lands on your own disk.
What the Review Will Cover
A first look is a hardware tour. The review comes after real time on the network, and it is about three things.
Performance. How it behaves as a working node rather than as a spec sheet, and what the capture file says about the site once there is enough of it to say anything.
Use case. Where a mains-powered Linux node earns its place next to the MCU nodes already on the mesh, and where it plainly does not.
The software, properly. This post touches the stack. The review opens it up: the openHop configuration in full, the failure modes worth knowing about before you hit them, the dashboards and MQTT side, and what it takes to run a node like this without it quietly becoming a second repeater.
Who It’s For
If you want a fixed indoor node you can administer remotely and build on, this is aimed at you. The HAT means the radio is not a dead end and the second IO slot is open, the four USB ports mean a second protocol is a dongle away, and the Linux host means the node is a computer rather than an appliance.
If you are building a solar repeater, this is the wrong tool and the Booster kit is the right one. No battery input, no solar path, mains only.
If you are on MeshCore and assumed a Pi-based Meshtastic box meant hanging a companion radio off a USB port, it does not. The board presets are already upstream, the pin map is published here, and the radio inside RAK’s Meshtastic gateway will run your mesh instead.
You can find the WisMesh Station on the RAKwireless store or from Rokland in the US. New to this? Start with the MeshCore getting started guide or browse compatible devices.
Comments
Related Posts
EasySkyMesh PowerSaving 17: RX Sleep Down to 0.9 mA
EasySkyMesh PowerSaving 17 adds RX duty-cycle sleep, pushing RAK4631 repeaters to 0.9 mA. Built on MeshCore 1.16, plus a GPS powersaving catch-up.

MeshCore Firmware v1.17: New Radio Logic and JSON Config
MeshCore 1.17.0 release notes: listen-before-talk rewrite, JSON config migration, new hardware (including our SenseCAP X1 port), and key fixes.
MeshCore's Next Release Will Ship With the SenseCAP X1 Built In
Our MeshCore X1 port merged upstream and will ship in the next release. Grab the full-feature v2.0.0 build with RGB status and haptics now.