MeshCore Explained: Roles, Routing, and Building a Mesh
How MeshCore's companion, repeater, and room server roles work. Plus path routing, frequency settings, flashing, and the most common fixes.
Most people who try MeshCore flash the firmware, open the app, and immediately wonder why it looks like nothing is happening. No devices in the contact list. Silence on the radio. No idea if it’s working.
It’s working. You just haven’t learned the rules yet.
MeshCore is a fundamentally different architecture from what most people expect coming from other LoRa systems. Once you understand how it’s designed, why it works the way it does, the whole thing clicks. This guide walks through everything end users actually need to know. Device roles, how messages find their way across the mesh, flashing firmware, the advert system, setting up a repeater, room servers, and the app ecosystem.
We run MeshCore on our own network. What’s below is a mix of the official docs, practical notes from our own nodes, and the stuff we wish someone had told us on day one. No jargon dumps. No specs for their own sake.
MeshCore Device Roles: Companion, Repeater, and Room Server
MeshCore divides devices into three distinct roles. This isn’t optional configuration. It’s the foundation of how the system works. Each role is a separate firmware build, and each one has a specific job.
Companion is the firmware for your personal device. The one connected to your phone via Bluetooth or USB. Companions send and receive messages, but they don’t relay traffic for other nodes. If a message isn’t meant for you, your companion radio ignores it. This is deliberate. It keeps the airwaves cleaner and saves your battery.
Repeater is infrastructure. A repeater’s only job is to forward packets toward their destination using smart routing decisions. Repeaters don’t generate user traffic. They move it. Place them high (rooftop, tower, hilltop) and power them from solar or continuous USB. A well-placed repeater is the difference between a short-range experiment and a mesh that covers real distance.
Room Server is a store-and-forward bulletin board. When you’re out of range or offline, a room server holds messages for you. Log back in and it delivers up to 32 previously unseen messages. Room servers can also act as repeaters if needed. Think of them as the post office for your mesh.
 MeshCore runs on 50+ devices across companion, repeater, and room server roles. Image via CNX Software.
You don’t need all three roles to get started. One companion radio and a phone gets you on the air. Two companions let you talk to a friend. Add a repeater and you start building something with real range.
How MeshCore Routes Messages: Path Learning vs Flooding
This is the part that makes MeshCore different from Meshtastic.
Meshtastic floods messages across the network. Every node retransmits until the message reaches its destination or expires. It works, but it generates a lot of radio chatter, and every device you add contributes more traffic.
MeshCore learns paths.
When you send your first message to a contact, it floods the network looking for that device. Once delivered, the recipient’s device sends an acknowledgment back through the mesh, and that return path gets recorded in your contact’s routing information. Every message after the first goes directly through the specific repeaters that form that learned route.
No unnecessary retransmissions. No constant chatter. The more you communicate, the more efficiently the network routes your traffic.
If a path breaks (a repeater goes offline, conditions change), MeshCore retries three times, then resets the path and floods on the final attempt to discover a new route. It fails gracefully and re-learns automatically.
Group channels (the public channel and any private group channels) always flood, since there’s no single destination to build a path to. Direct messages use smart routing as soon as the path is established.
Frequency Settings: Get This Right First
Every node on your mesh needs to use the same radio configuration. This is the most common reason new users see nothing when they power on their device.
MeshCore supports:
- 868 MHz for UK and Europe
- 915 MHz for North America, New Zealand, and Australia
Beyond the frequency band, three parameters need to match across your network.
BW (Bandwidth). How wide a slice of spectrum your signal uses. Narrower bandwidth means better range and penetration, but slower data rate. The current recommended setting is 62.5 kHz (BW62.5), which replaced the older 250 kHz default in late 2025.
SF (Spreading Factor). Controls how long the radio spends transmitting each bit. Higher SF means longer range and slower speed. SF7 is the current recommended starting point for most networks. Faster throughput while still covering good distances.
CR (Coding Rate). Error correction redundancy. CR5 (4/5) is the standard. If you’re dealing with weak, intermittent links, CR7 or CR8 add more error correction at the cost of speed.
For North American users, the recommended starting config is 910.525 MHz, BW62.5, SF7, CR5. Your region preset in the app will handle this, but it’s worth knowing the numbers so you can verify everything matches when troubleshooting.
What You Need to Get Started
You need at least one LoRa-capable device and a phone. The device options break into two categories.
Companion radios (require a phone app to operate):
- Heltec WiFi LoRa 32 V3. The workhorse. ESP32-S3, SX1262 radio, onboard OLED, USB-C, onboard LiPo charging.
- Heltec V4. Newer, with amplified LoRa and some improvements over the V3.
- RAK WisBlock 4631. nRF52840 based, excellent power efficiency, modular expansion.
- Seeed Studio XIAO nRF52840, Wio Tracker L1 Pro, T1000-E. Solid options in the nRF52 family.
- ThinkNode M1. Purpose-built for MeshCore.
Standalone devices (no phone required):
- LilyGO T-Deck Plus. The most popular standalone. Physical keyboard, 2.8” screen, ESP32-S3, SX1262, built-in GPS. Runs either the official MeshCore T-Deck firmware or MeshOS by Andy Kirby.
- LilyGO T-Pager. Pager-style form factor, standalone messaging without a phone.
- T-Watch S3, T-Display S3 Pro. Watch and display form factors for different use cases.
For most beginners: start with a Heltec V3 or RAK 4631 as a companion radio (both available cheaply online), paired with the MeshCore smartphone app. It gets you on the air fast without spending extra on a standalone device.
Flashing MeshCore Firmware
MeshCore firmware is flashed through the web flasher at flasher.meshcore.io. No command line required. Open it in Chrome, plug in your device, click flash.
The flasher will ask you which firmware type and which device. Pick the right one. BLE Companion for phone Bluetooth connection. USB Serial Companion if you’re using the web client via USB. The rest is automatic.
For nRF52-based devices (RAK, T1000-E, XIAO), firmware downloads as a ZIP file and flashes through the DFU process. The flasher guides you through it.
If you need to start fresh on an nRF52 device, enter flash mode by double-clicking the reset button until the device shows up as a drive, then copy the appropriate flash_erase.uf2 file to wipe it clean before reflashing.
For Raspberry Pi or Linux users who want to flash without a GUI browser, esptool handles ESP32 devices and adafruit-nrfutil handles nRF52 devices. The MeshCore FAQ has the exact commands for both.
The App Ecosystem
MeshCore has several ways to connect your phone or computer to a companion radio.
Native Android and iOS apps by Liam Cottle. Connect via Bluetooth to a BLE Companion radio. Feature-rich, actively maintained, freemium (most features are free). Download from your app store.
Web client at meshcore.nz. Connects via USB Serial to a companion radio. Works from any browser on any platform, no install needed. Useful on desktop, Chromebooks, or any device without Bluetooth.
MeshCore Open is a free open-source alternative available on Android, iOS, desktop, and web.
T-Deck and T-Pager standalone firmware. No phone needed. The T-Deck runs either Scott’s official firmware (with an optional $10 unlock for advanced features like deeper map zoom and remote server admin) or MeshOS by Andy Kirby. Both are capable full-featured mesh clients.
All of these connect to the same MeshCore network. Choose based on your hardware and how you want to operate.
 The MeshCore smartphone app showing a public channel conversation. Screenshot via Michael Lynch.
First Contact: The Advert System
New MeshCore users often open the app and see an empty contact list. This is normal. MeshCore doesn’t announce devices continuously like Meshtastic. It uses adverts, and adverts are opt-in.
An advert broadcasts your device’s name, location (if you’ve set one), and public encryption key. Other nodes that hear your advert can add you to their contact list, and you can direct-message each other from that point forward.
You trigger adverts manually, or they happen automatically on a schedule.
Zero-hop advert. Broadcasts to immediately nearby devices only. Repeaters don’t forward it. Use this when you’re trying to connect with someone close by or testing direct range.
Flood advert. Repeaters forward it across the mesh. Use this when you want to announce yourself to the wider network or reach nodes multiple hops away.
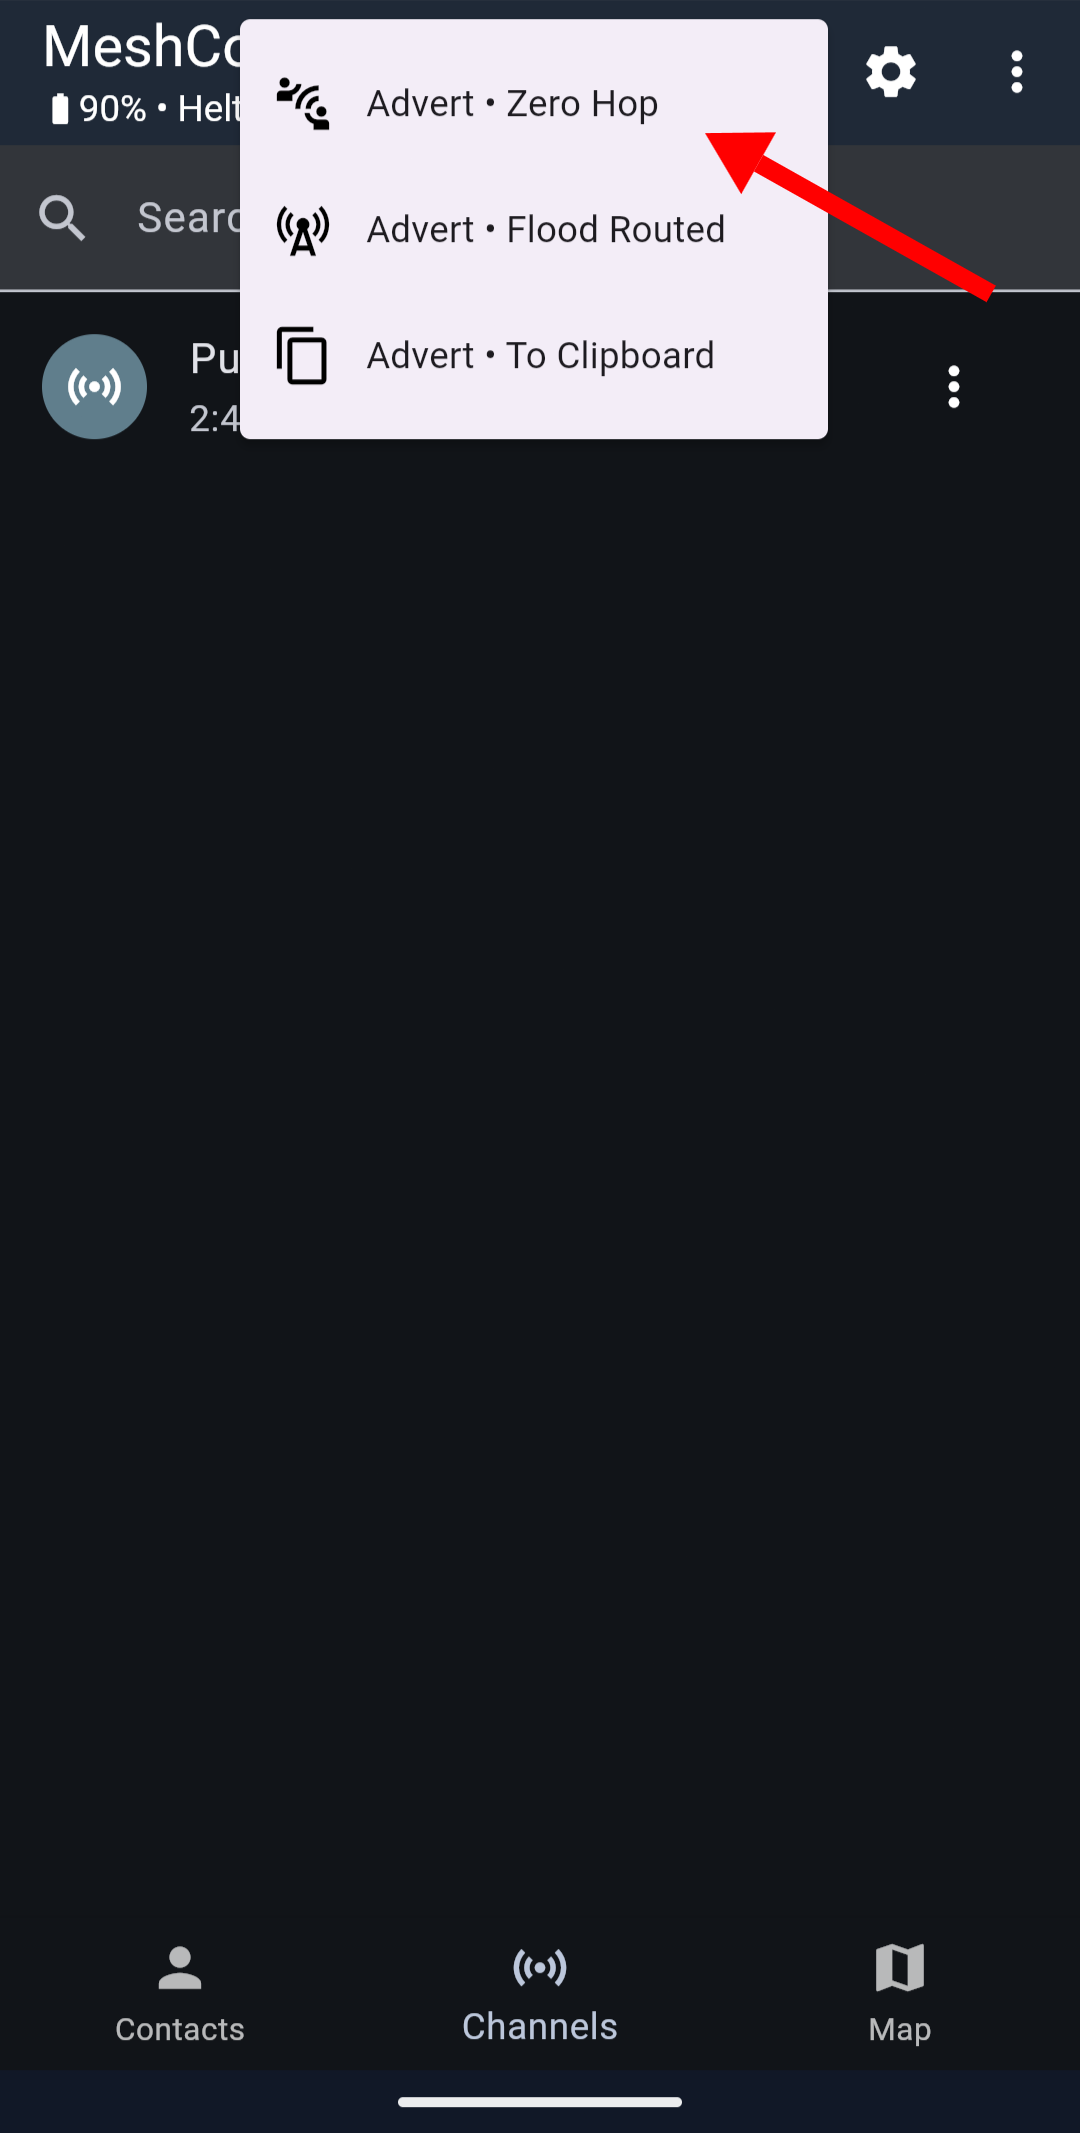 The MeshCore advertise menu. Zero hop stays local; flood reaches the wider mesh. Screenshot via Michael Lynch.
By default, repeaters send flood adverts every 12 hours. If you’re waiting for a repeater to show up in your contact list, you might be waiting a while. Send a flood advert yourself to introduce your device to the mesh. The repeater will hear it and you’ll hear the repeater’s next advert too.
For a deeper walkthrough of contact discovery, see our MeshCore device discovery guide.
Setting Up a MeshCore Repeater
A single repeater in a good location transforms what’s possible with MeshCore. Smart placement beats number of devices every time.
Hardware. Anything that runs MeshCore repeater firmware works. The RAK 4631 is popular for permanent installations because of its low power draw (~8 to 10 mA idle with optimized firmware). Heltec V3 works well too. It draws more current but is widely available and easy to configure. The Station G2 is worth considering for high-power deployments. Check the FAQ for transmit power limits, because incorrect settings can damage the radio permanently.
Placement. High and clear wins. A repeater on a rooftop covers dramatically more than the same hardware at ground level. Line-of-sight range at height can exceed 10 km. Obstructions kill range. Every meter you gain in elevation is worth more than any antenna upgrade. For a purpose-built outdoor repeater, look at the MeshCore solar repeater build.
Configuration. After flashing repeater firmware, connect via USB serial (or the web interface at config.meshcore.dev) to set the basics:
set name MyRepeater       # give it a recognizable name
set lat 46.879682         # your GPS latitude
set lon -96.789803        # your GPS longitude
password yourNewPassword  # change from the default "password"
advert                    # send an advert so nearby nodes can find it
The repeater will send flood adverts every 12 hours by default. You can tighten that interval:
set flood.advert.interval 6 # send flood adverts every 6 hours insteadPower. Repeaters that run on batteries need real attention to power draw. If you’re building a solar-powered or battery-backed repeater, look at the EasySkyMesh firmware variant, which achieves 8 to 10 mA idle current on Heltec V3 and RAK 4631. The difference between 8 mA and 80 mA is the difference between a solar panel you can afford and one that costs as much as the hardware itself.
Remote administration. Once your repeater is in the field, you can administer it through the MeshCore app if you’re within range and have the admin password. Clock sync, stats, configuration changes. No physical access needed for most things.
Room Servers: The Mesh BBS
A room server solves a specific problem: what happens when someone you want to reach isn’t online when you send your message?
On a basic MeshCore network, if a contact is out of range or their radio is off, your message doesn’t get delivered. There’s nowhere for it to go. A room server holds messages until the intended recipient comes online and logs in. They’ll receive up to 32 messages they haven’t seen yet.
Room servers also support a public BBS mode where multiple users can post and read messages to a shared space. Like a community bulletin board for your local mesh.
Key things to know:
- They should run on dedicated hardware, separate from a repeater (though a room server can enable repeating with
set repeat on) - The default guest join password is “hello”. Change this immediately with
set guest.password yourPassword - The default admin password is “password”. Change this too with
password yourNewPassword - Users need to be in radio range of the room server (or reach it through repeaters) to log in and retrieve messages
Room servers are most useful when your mesh has regular participants who aren’t always online simultaneously. For a small mesh where everyone’s usually active at the same time, they’re optional.
Getting on the Map
MeshCore has a live map at map.meshcore.io that shows nodes around the world.
To add yourself:
- Smartphone app. Connect to your companion radio → 3-dot menu → Internet Map → 3-dot menu → Add me to Map.
- Repeater or Room Server. In your contact list, tap the 3-dot next to your server → Share → Upload to Internet Map.
Your node needs latitude and longitude set for it to show at the right location. On a repeater, set it via CLI:
set lat 46.879682
set lon -96.789803
The map is a good way to see what infrastructure already exists near you before you start building. It’s also satisfying to watch your own node appear.
OTA Firmware Updates
Updating your companion radio or repeater firmware without physical access is straightforward once you’re on recent firmware versions.
For ESP32-based devices (Heltec V3, V4):
- Download the non-merged firmware from flasher.meshcore.io
- Log into the repeater via the app with admin access
- In the Command Line tab, type
start otaand press enter - The repeater starts a Wi-Fi hotspot called “MeshCore OTA”
- Connect your phone or computer to that hotspot
- Go to
http://192.168.4.1/updateand upload the firmware file
For nRF52-based devices (RAK, T114, T1000-E, XIAO):
- Download the ZIP firmware from flasher.meshcore.io
- Install the “nRF Device Firmware Update” app on your phone
- Log into the device via the MeshCore app with admin access
- Type
start otain the Command Line tab - Open the nRF DFU app, enable packet receipt notifications, set packets to 10 (RAK) or 8 (T114)
- Select your firmware ZIP and upload
Common MeshCore Problems and Fixes
Contacts showing “last seen many days ago.” Clock sync problem. MeshCore tracks when it last heard from each node, and if your device’s clock is wrong, everything looks ancient. For T-Deck: set the clock manually using epoch seconds from epochconverter.com. For repeaters: use the time {epoch} command via USB serial.
Repeater not hearing nearby radios. SX1262 radios can develop “deafness” in high-interference environments. Fix it with set agc.reset.interval 4 via CLI. This resets the auto-gain controller every 4 seconds and usually resolves the issue immediately.
Heltec V3 dropping Bluetooth. The stock PCB coil antenna for Wi-Fi and Bluetooth has extremely short range, sometimes just a few feet. Removing it and soldering in a 31 mm wire antenna makes a significant difference.
Linux web flasher failing with “failed to open.” File permission issue. Run setfacl -m u:$USER:rw /dev/ttyUSB0 (adjust port name as needed) and try again.
First byte of your repeater’s public key matches another repeater nearby. This doesn’t break message delivery, but it complicates mesh analysis tools. Generate a new key pair at gessaman.com/mc-keygen/ until you get a unique first byte within ~10 miles of neighboring repeaters.
Key Resources
Everything you need to go deeper:
- Web Flasher. flasher.meshcore.io
- Smartphone App. Search “MeshCore” on Android or iOS (by Liam Cottle)
- Web Client. meshcore.nz
- Docs. docs.meshcore.io
- GitHub. github.com/meshcore-dev/MeshCore
- Web Config (USB). config.meshcore.dev
- Community Map. map.meshcore.io
- Awesome MeshCore (community projects list). github.com/samuk/awesome-meshcore
The MeshCore documentation has moved to docs.meshcore.io and covers the companion protocol, CLI commands, packet formats, and KISS modem protocol for anyone building custom integrations. The MeshCore wiki on NodakMesh mirrors the key GitHub wiki pages in a more readable format.
Ready to set up your own network? Start with our getting started guide, then explore the CLI guide for advanced configuration and our firmware guide for flashing instructions.
Questions about MeshCore or this guide? Come find us on Discord. If you’re building nodes in North Dakota, we’d love to know what you’re working on.
Comments
Related Posts
Seeed MeshCore Starter Kit: Solar Repeater + Client Bundle
Seeed's MeshCore Starter Kit bundles a solar repeater and Wio Tracker L1 Pro into one off-grid mesh. Antenna picks, setup tips, and who it's for.

MeshCore Path Hash Modes Explained: 1, 2, and 3 Byte
How MeshCore's 1, 2, and 3 byte path hashes work, why 1-byte collides at scale, and when to switch. Guide to path.hash.mode for growing meshes.

Meshtastic Range Test: Map Your Mesh Coverage
Measure and map Meshtastic coverage with the range test module, trace route, signal metrics, and MeshMapper. Field tips for flat-plains deployments.