Harbor Breeze Solar Meshtastic Node: $10 Build Guide
Turn a Harbor Breeze solar garden light into a weatherproof solar-powered LoRa mesh node with RAK WisBlock. Full BOM, wiring, and setup.
We’ve built and deployed several of these across the NodakMesh network. They survive North Dakota winters when sited well, draw effectively zero idle current thanks to the RAK4631’s sleep behavior, and cost less per deployed node than almost any other outdoor option. This guide is the consolidated walkthrough we hand to anyone in our Discord asking how to put a repeater on a fence post for under thirty dollars. The build itself originated in the wider Meshtastic and MeshCore community (credit to u/cowdog360 for the reference build that proved this works); what we’ve added here is the bill of materials at current prices, the wiring photos from our own builds, and the lessons from putting these in the field through actual ND weather.
Have an inexpensive solar garden light lying around? You can hack the Harbor Breeze 60-lumen solar LED floodlight (from Lowe’s) into a waterproof, solar-powered enclosure for a mesh networking node.
This hack takes a ~$10-15 USD yard light and transforms it into a self-contained Meshtastic (LoRa mesh) node powered entirely by the sun. The Harbor Breeze unit already includes a capable solar panel, a 3.7V 18650 lithium-ion battery (1500 mAh), and even a basic charge controller, all sealed in an outdoor-friendly case.
By installing a RAK Wireless WisBlock board (specifically the RAK4631 core and related modules) inside, you get a completely off-grid, weatherproof LoRa mesh node for very little cost.
This build is well documented in the Meshtastic and MeshCore community. We’ve pulled the steps, BOM, and photos together in one place here. Credit to u/cowdog360 and the rest of the mesh community for the reference builds and wiring diagram.
Why This Build Works
Mesh networks like Meshtastic and MeshCore let low-power devices relay messages over long distances via LoRa radio. Outdoor nodes need continuous power and protection from the elements. A solar yard light solves both problems in one package. It’s already designed to survive rain (rated around IPX5), and it recharges the battery each day via sunlight.
The conversion is simple because the RAK WisBlock components fit in the light’s solar compartment. The result is a stealthy mesh node that looks like a regular yard light (the LED can be left operational for camouflage) but forwards LoRa messages and sensor data over a wide area. You can deploy it on a fencepost, a roofline, or a pole. Plant it like a garden light and you’re done.
In this guide we’ll walk through the entire build. Disassembling the Harbor Breeze light, installing the RAK WisBlock core and modules, rewiring the solar panel and battery into the RAK power inputs, and sealing everything up for the weather.
This DIY project requires only moderate skills. Basic soldering for a couple of wires and drilling one hole for the antenna bulkhead are the hardest steps.
Materials and Bill of Materials
To keep things simple and ensure compatibility, we’ll use RAK Wireless WisBlock parts for all the electronics.
Required Components
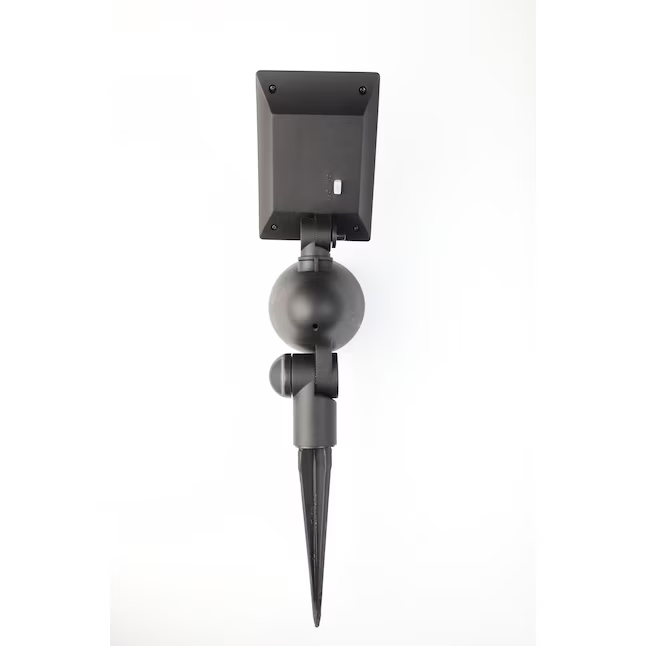
Harbor Breeze 60LM Solar LED Light - The star of this project. Available at Lowe’s (sometimes under item #SL1832). It’s a 60-lumen solar floodlight in a black plastic housing, comes with a 5-6V solar panel and a 3.7V 1500 mAh Li-ion battery built-in. Approx. $10-15 (often on sale for ~$8).
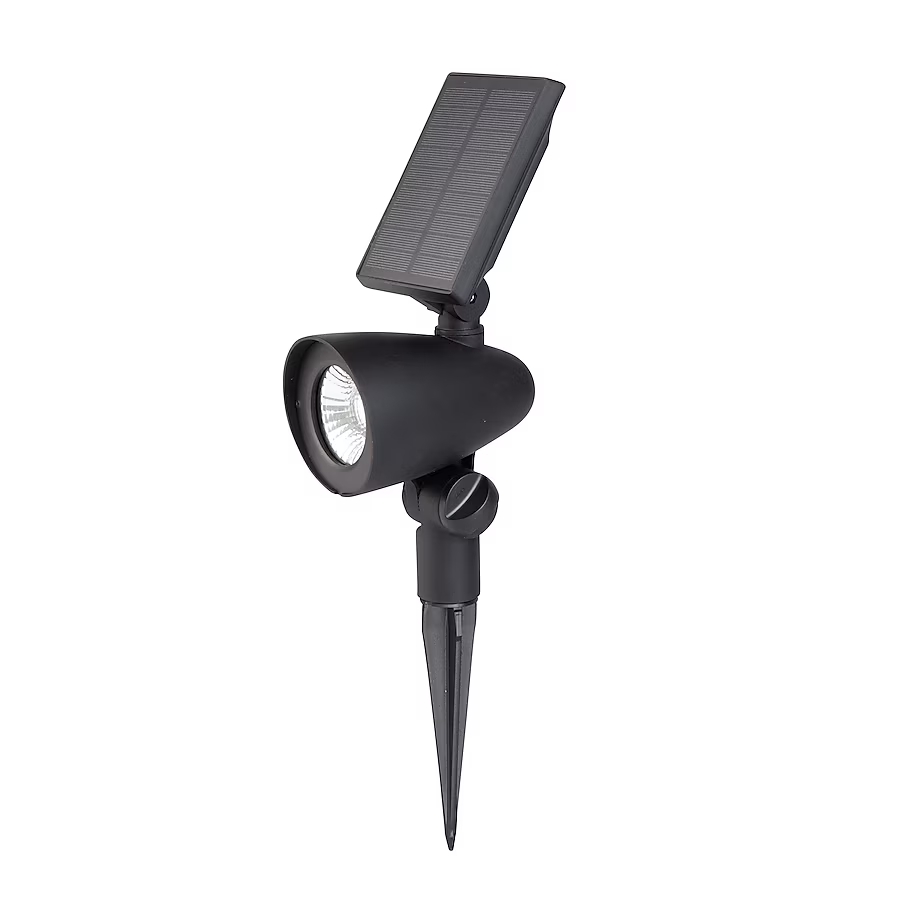 The Harbor Breeze 60-lumen solar LED floodlight from Lowe’s.
RAK4631 WisBlock Core Module - The main MCU + LoRa radio module. It’s a Nordic nRF52840 microcontroller paired with an SX1262 LoRa transceiver (LoRaWAN/LoRa 915 MHz). We’ll use it as the brains running Meshtastic or custom mesh firmware. Approx. $18-24.
RAK19007 WisBlock Base Board (2nd Gen) - The WisBlock base with slots to plug in the core and sensor modules. It has a USB-C port for programming, a JST-PH battery connector, and importantly a JST-ZH connector for a 5V solar panel input with an onboard Li-ion charge controller. This board will manage power from the solar panel and battery. Approx. $9.99.
RAK12500 GNSS Module (Optional) - An optional GPS receiver module (u-blox ZOE-M8Q based) to add location capability to your node. Useful if you want the node to report its position or provide time sync in the mesh. Plugs into the WisBlock base. Approx. $19.
915 MHz LoRa Antenna - An external antenna for the LoRa radio. We recommend a small 2 dBi whip antenna tuned for ~915 MHz (appropriate for US ISM band) to maximize range. RAK Wireless offers a 2 dBi sub-GHz antenna for about $5, or you can use any LoRa 915 MHz antenna with an SMA connector. Approx. $5-10.
u.FL (IPEX) to SMA Bulkhead Pigtail Cable - A short RF cable to connect the RAK4631’s antenna port to the external antenna. One end is a tiny u.FL plug that snaps onto the RAK4631’s LoRa antenna jack, and the other end is a bulkhead SMA female connector with a nut/washer that mounts through the enclosure wall. We suggest a ~10 cm (4 inch) cable. Approx. $5.
3.7V Li-ion Battery, 18650 size (if needed) - The Harbor Breeze light includes a removable 18650 Li-ion cell (1500 mAh), which you can reuse. If that battery is missing or you want a higher-capacity upgrade, get a similar 18650 Li-ion (with protection circuit if possible). Approx. $5-10.
JST-PH 2-Pin Battery Cable - If your battery or holder doesn’t already have a JST-PH plug compatible with the RAK19007, you’ll need a cable or connector to hook the battery to the base board.
Miscellaneous Hardware - Heat-shrink tubing or electrical tape, silicone sealant, basic tools (screwdriver, soldering iron, wire cutters, 1/4” drill bit for the antenna hole).
3D Printable Mounts (Optional)
The community has created several 3D printable mounts for this build:
- Pole Mount for Harbor Breeze - Standalone pole mount for your node
- Harbor Breeze Screw-in Mount - Standard screw-in mounting option
- N-Type Adapter for Screw-in Mount - Add-on for the screw-in mount above with N-type connector support
Where to Buy
- Harbor Breeze 60LM Solar Flood Light at Lowe’s - The enclosure for this build
Disassembling and Modding the Enclosure
Converting the Harbor Breeze light doesn’t require heavy modification. The unit is designed to be user-serviceable, so it comes apart easily.
Step 1: Open the Solar Panel Compartment
On the back side of the solar panel (the top section of the light), locate the four small screws at the corners. Remove these screws to lift off the back cover of the solar compartment. Be careful not to damage the gasket seal when prying it open.
Once opened, you’ll see the internal components: a rechargeable 18650 battery (likely in a plastic holder) and a small circuit board for the original LED/charging circuit.
 Inside the Harbor Breeze solar light after opening. Visible are the 3.7V 18650 battery and the original charge/controller board.
Step 2: Remove the LED Spotlight
The Harbor Breeze has a separate lamp head (the LED housing) usually attached via a short wire and a swivel mount. Detach the light head from the solar panel unit. There may be a screw or clip on the bracket that you can undo to separate it.
Once the LED unit is physically detached, cut the two wires leading from the solar compartment to the LED lamp. This will disconnect the LED completely. We do this because the LED would otherwise turn on at night and drain the battery, which we want to reserve for our node.
After cutting, seal up the wire hole: you can either leave the rubber grommet in place and later run the antenna cable through it, or fill the hole with silicone sealant if it will remain unused.
If you want the LED to function for camouflage (so your node still lights up at night like a normal garden light), you can leave it connected. Running the LED nightly will consume extra battery power, so it’s a tradeoff.
Step 3: Remove or Bypass the Original PCB
The small circuit board inside the compartment is the stock charge controller and dusk/dawn sensor for the light. We will not use this board to run our node (the RAK base board has its own power management).
Easiest approach is to remove it entirely. It’s typically held by a couple of small screws or clips. Before removal, note the connections: you’ll see two wires from the solar panel and two from the battery connected to this board.
Desolder or cut the solar panel leads and battery leads from the board. If you cut them, leave enough length on the wires to attach to our RAK connectors later. You can then take out the PCB.
Step 4: Drill a Hole for the Antenna
To maintain a good waterproof seal, we’ll mount an SMA bulkhead connector for the LoRa antenna through the plastic housing. A 1/4” (6-7 mm) drill bit is typically right for an SMA connector.
Choose a location on the enclosure to drill: ideally on one of the flat sides or on the bottom of the solar panel compartment. Avoid the top surface where the solar cell is, and steer clear of the area directly above the battery.
Many builders use the existing LED wire hole for the antenna cable. It’s a convenient spot and may only need slight widening to fit the SMA connector.
After drilling, insert the SMA bulkhead of your pigtail cable into the hole from the outside, and secure it with its nut and washer. Seal around it with silicone to guarantee no water ingress.
Step 5: Plan the Internal Layout
The RAK WisBlock base board with the core module is quite small (30 x 60 mm) and will easily fit in the solar compartment. A good spot to place it is next to the battery holder, where the original PCB sat.
You can use a bit of adhesive (hot glue or double-sided foam tape) to secure it to the plastic housing. Position it such that the antenna pigtail cable can reach the RAK core’s u.FL connector without strain.
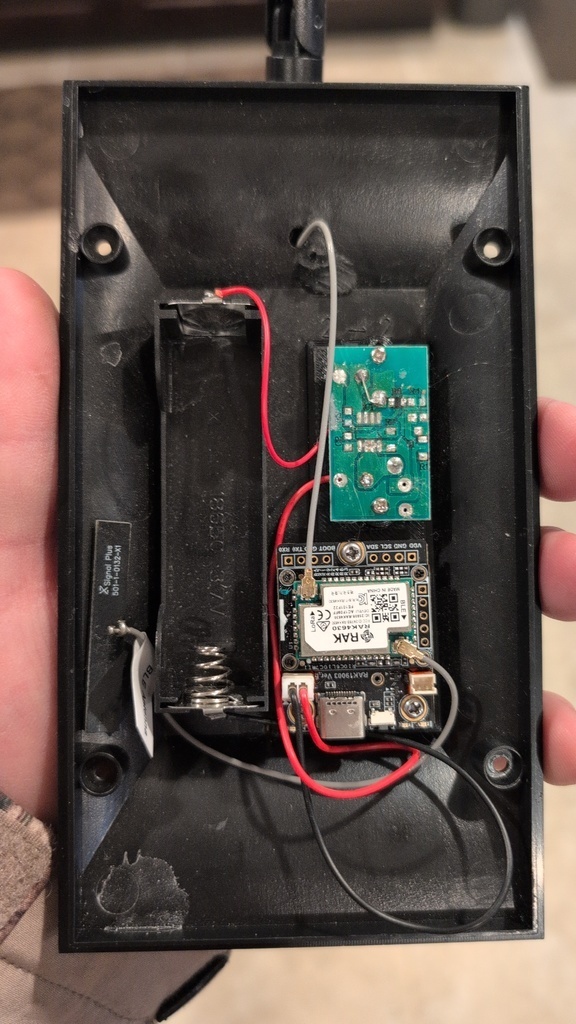 RAK WisBlock installed inside the Harbor Breeze enclosure.
Step 6: Install the LoRa Antenna Cable
Connect the u.FL end of the coax pigtail to the RAK core module’s LoRa antenna jack. This is a delicate snap-on connector. Align it carefully and press straight down until it clicks.
Double-check it’s seated; a loose antenna cable can degrade signal. Once connected, route the cable inside the compartment so it doesn’t get pinched by the cover. If there’s excess slack, coil it gently; avoid sharp bends.
Power Setup (Solar Panel & Battery Integration)
One of the advantages of using the RAK WisBlock base is that it has a built-in power management system designed for exactly this scenario. A Li-ion battery charged by a solar panel. We just need to hook the Harbor Breeze’s panel and battery to the correct ports on the board.
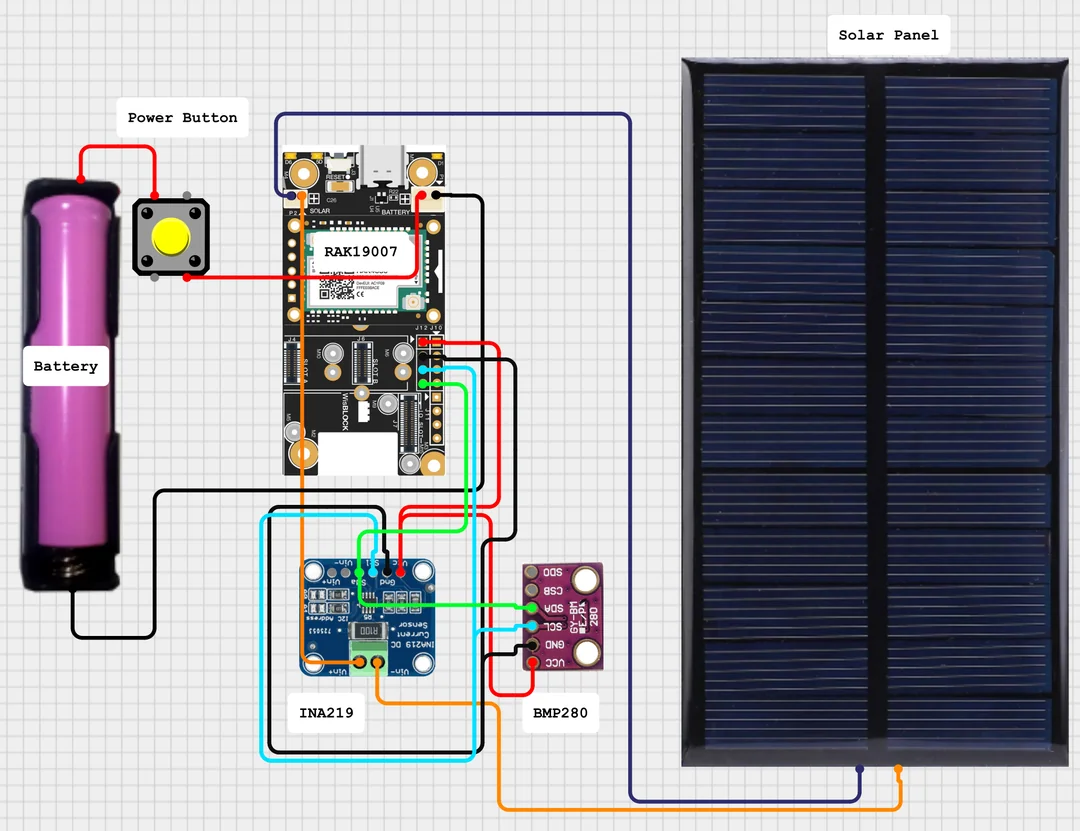 Wiring diagram for the Harbor Breeze solar node build. Credit: u/cowdog360
Battery Connection
The RAK base has a JST-PH 2-pin socket for battery input (3.7V Li-ion/LiPo). Locate the battery wires from the Harbor Breeze. Typically, there’s a red wire (positive) and black wire (negative) coming from the battery holder.
If you have a JST-PH pigtail cable: solder the Harbor Breeze battery leads to the pigtail’s wires. Be careful with polarity. Usually red goes to JST pin ”+” and black to ”-”.
The Harbor Breeze battery is 18650 Li-ion, 3.7V nominal (4.2V full). The RAK WisBlock supports this chemistry. The board’s charger will stop at around 4.2V.
Solar Panel Connection
The RAK base has a JST-ZH 2-pin header for a solar panel input (labeled 5V SOLAR). This expects a small solar panel around 5-6V output (open-circuit). Conveniently, the Harbor Breeze’s panel is about 6V open-circuit and ~5V under load, which is perfect.
Take the two wires from the solar panel (the ones that were connected to the old board). Determine which is positive and which is negative: often the red or white wire is positive (+) and black is negative (-). Use a multimeter in sunlight to confirm the polarity if possible.
Connect these to the JST-ZH plug. Ensure correct polarity. The RAK datasheet or markings will show which pin is +. Once connected, the solar panel will feed into the RAK’s charger.
Charging Specs
The RAK charge controller will start charging the battery when the solar panel provides power and the battery is not full. It can handle up to ~5V input. Do not exceed 6V from the panel or you risk damaging the board’s charger.
The Harbor Breeze’s panel is relatively small (about 0.5W, ~90 mA at 5V in full sun), so it will trickle charge the battery. This is fine for a low-power mesh node: the node might draw a few milliamps on average (with LoRa radio mostly idle), so the solar panel can replenish the battery during the day.
With a 1500 mAh battery, you have a good buffer of several days of runtime.
Assembly and Weatherproofing
Now that the electronics are installed and wired, it’s time to button everything up and ensure the device will survive the outdoors. Good assembly practices and sealing will keep your node running trouble-free through rain, snow, and heat.
Secure Everything Inside
Before closing the enclosure, make sure all components are held in place.
The RAK board should be glued or taped securely so it won’t rattle. The battery should be snug in its holder. The Harbor Breeze has a clip that holds the 18650. If it’s loose, add a bit of foam to pad it.
Check that the antenna pigtail cable isn’t rubbing against sharp edges. If you added a GPS module or any sensor, secure those too. Hot glue can anchor small modules if needed.
Insulate any exposed solder joints with heat-shrink or electrical tape to prevent short circuits. Tuck excess wire lengths away from the screw holes and gasket area so they won’t get pinched when closing the lid.
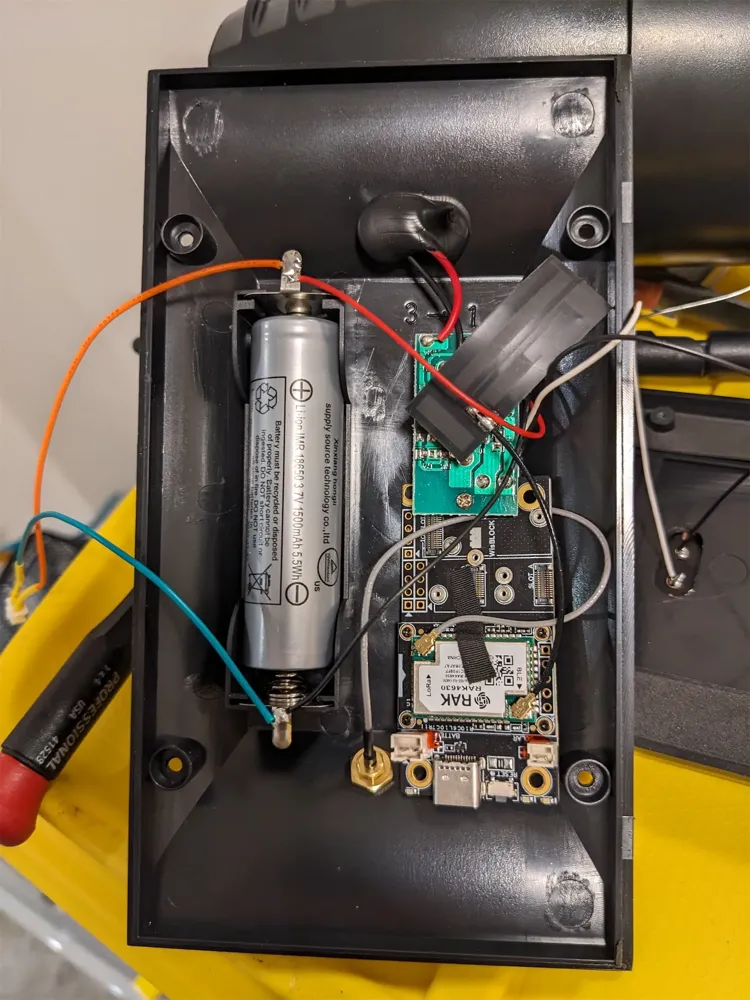 Internal assembly completed. The RAK WisBlock base/core is installed and connected to the battery and solar panel. The u.FL to SMA cable is routed out for the LoRa antenna. A tidy layout helps with closing the case and long-term reliability. Credit: u/cowdog360
Close Up the Enclosure
Place the back cover of the solar compartment on and re-insert the screws. Tighten all four screws evenly to compress any gasket seal. This keeps the compartment rainproof as designed.
The Harbor Breeze light is rated weather-resistant. As long as the seal is clean and intact, it will be waterproof as before.
If removing the original PCB left any unused holes, seal them now with a dab of silicone. Typically, the only new penetration is where the SMA antenna connector is mounted, which should already be sealed around.
Inspect the rubber o-ring or foam seal on the compartment. If it got dirty, wipe it clean before closing to ensure a good seal.
Mount the External Antenna
Screw your 915 MHz LoRa antenna onto the exposed SMA connector on the outside of the unit. Hand-tighten it so it makes good contact.
Many antennas are adjustable. You can angle or point it as desired. Try to orient it vertically when deployed. Vertical polarization is standard for LoRa.
The antenna being outside the enclosure will greatly improve range compared to any internal antenna, as it’s not obstructed by the case.
The bulkhead mount installed with a nut should be solid. If it wiggles, tighten the nut a bit more. Not too hard though, to avoid cracking the plastic. Make sure the sealant has filled the gaps.
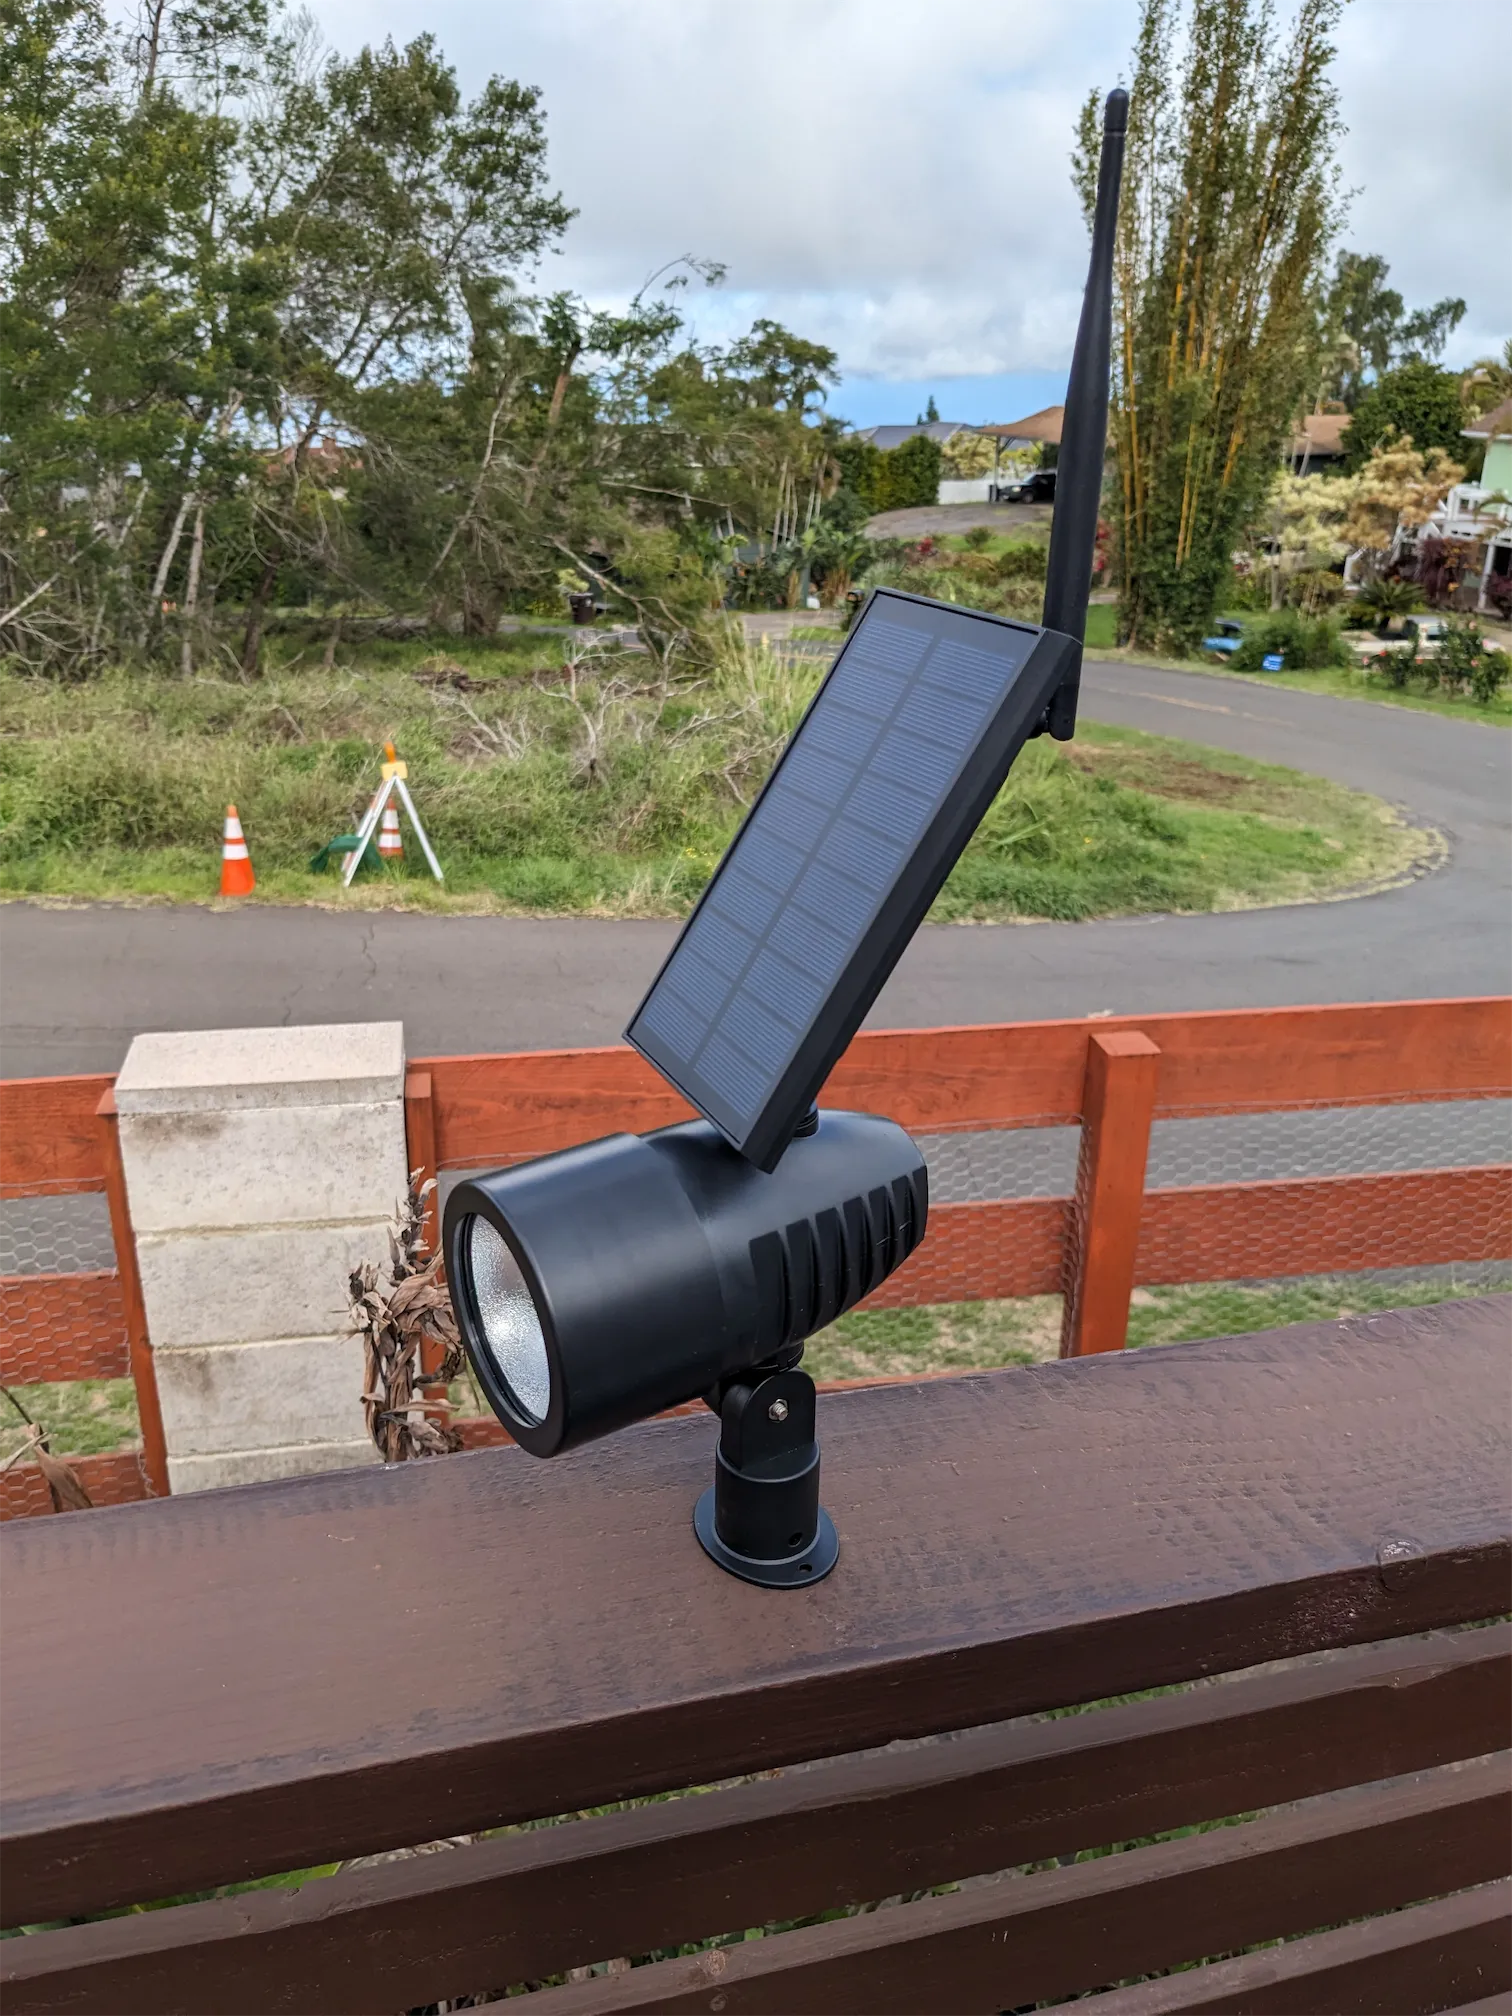 A completed Harbor Breeze solar mesh node ready for deployment. Credit: Meshtastic community
Weatherproofing and Condensation Prevention
All our critical electronics are inside the sealed top compartment. The LED lamp housing (bottom part) can actually be left off if you don’t need it. Some builders remove it entirely for a slimmer profile.
If you do keep the lamp housing attached for camouflage or mounting convenience, note that it is less waterproof than the solar panel compartment. You may want to add some silicone around seams of the lamp head or where the clear lens meets the body to prevent water ingress, especially if it will be exposed directly to rain.
After assembly, run a bead of silicone sealant around the new antenna connector and any other openings. Use an outdoor-grade silicone or marine sealant that remains flexible and waterproof. Permatex clear silicone or similar works well.
Condensation can sometimes occur in sealed devices due to humidity trapped inside. To mitigate this, try assembling on a dry day. You can also throw a small silica gel packet inside the compartment before closing to absorb moisture.
Re-mounting the Unit
The Harbor Breeze light comes with mounting options (ground stake or screws for wall mount). Use those to deploy your new node.
Ideally, place it where it gets good sunlight on the panel and decent height for RF range. For example, mounting it atop a pole or on your roofline will improve line-of-sight for the LoRa radio.
One simple method: attach it to a wooden rod or old broomstick and put it high up. Point the solar panel toward the sky.
Software Setup
With the hardware assembled, the final step is to get the RAK core running mesh networking firmware. You can choose either MeshCore or Meshtastic depending on your network.
Option 1: MeshCore
MeshCore is a lightweight mesh protocol optimized for long-range communication.
Flashing MeshCore:
- Visit the MeshCore Flasher
- Connect your RAK board via USB
- Select your device type and click Flash
- After flashing, the board will reboot with MeshCore firmware
Setup:
Download the MeshCore Companion app for iOS or Android. Connect via Bluetooth and configure your node name and channel settings.
For NodakMesh, check our MeshCore Getting Started guide for channel configuration.
Option 2: Meshtastic
Meshtastic is a popular open-source LoRa mesh project with a large community.
Flashing Meshtastic:
- Go to flash.meshtastic.org
- Put the RAK into bootloader mode by double-pressing its reset button (it will appear as a USB storage device)
- Upload the Meshtastic firmware file via drag-and-drop or the web flasher
Setup:
Install the Meshtastic app on your Android or iOS device. The RAK WisBlock has Bluetooth Low Energy, and Meshtastic firmware will advertise itself.
Open the app and pair to the new node (look for “Meshtastic-xxxx”). After connecting, you can:
- Set a friendly name for your node
- Configure the radio region (set to US915 for North Dakota)
- Add it to your mesh network channel
For NodakMesh, check our Meshtastic Getting Started guide.
Verify Everything is Working
Put one node at a distance and try sending a test message, or check the mesh map to see the new node.
The solar node should operate autonomously. Charging by day and running 24/7. Both MeshCore and Meshtastic nodes automatically sleep and conserve power when idle, so a charged 1500 mAh battery can last many days even without sun. With regular sunlight, the setup will stay charged indefinitely.
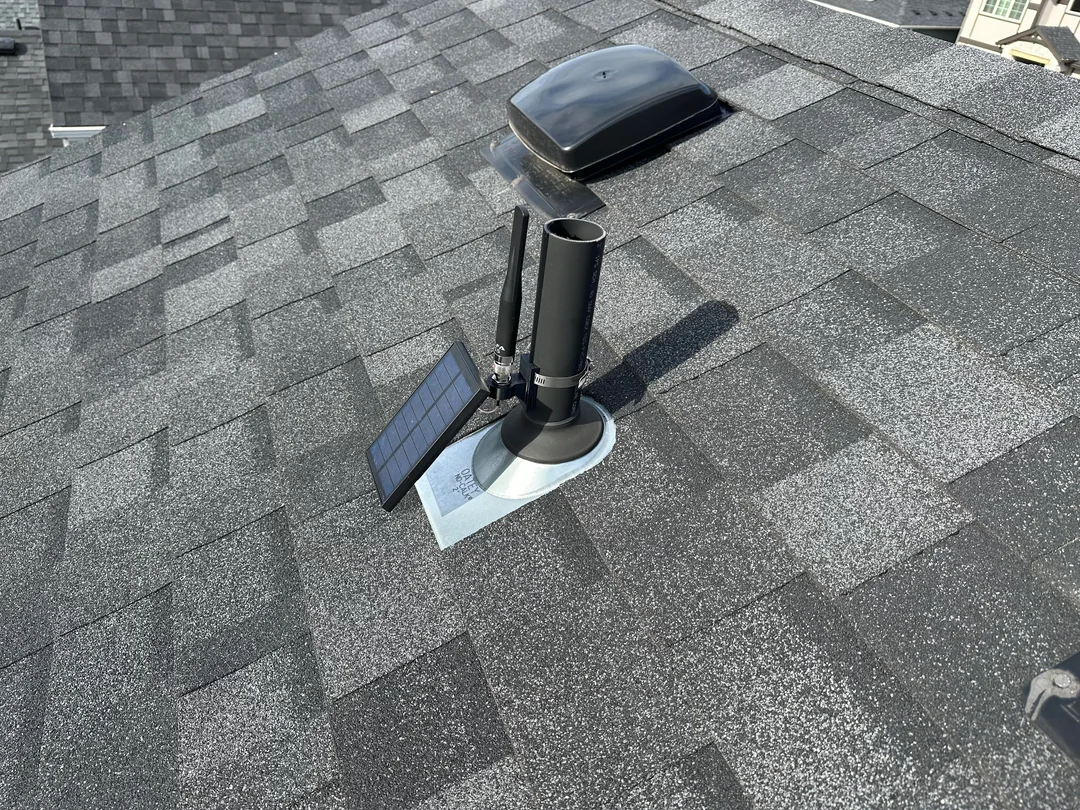 A completed Harbor Breeze solar mesh node deployed and ready for action. Credit: u/cowdog360
Safety Notes
Building this solar mesh node is straightforward, but please keep these safety considerations in mind:
Lithium-Ion Battery Handling
The 18650 Li-ion cell can deliver high current if shorted, which is dangerous. Do not short-circuit the battery terminals.
When working on the wiring, disconnect the battery until you’re ready to test, so you don’t accidentally touch bare wires together. If soldering near the battery, be extremely careful with the soldering iron. Better yet, remove the battery from its holder while soldering to wires.
Also, avoid crushing or puncturing the cell. If the battery shows any signs of damage or swelling, replace it.
Polarity and Voltage Checks
Verify all connections with a multimeter before powering the RAK board. Check that the battery is wired with correct polarity into the JST-PH (red to +, black to -). A reverse-connected battery could fry the board or the charge chip.
Likewise, check the solar panel wiring polarity into the JST-ZH. The panel voltage (in sun) should read about 5-6V DC. Anything significantly higher means you might have the wrong panel. The RAK solar input is designed for ~5V; do not connect a large 12V panel or you will damage the charging circuit.
Secure Insulation
Cover any exposed solder joints or splices with heat-shrink tubing or electrical tape. This prevents accidental shorts if things shift. Ensure the battery leads are not loosely floating; secure them so they won’t rub or fray over time.
Weatherproofing Caution
After assembly, double-check that all seals are tight. Water ingress can short electronics or cause corrosion.
The silicone sealant should be fully cured before you put the node into service outdoors. Also, don’t open the case in rainy/humid conditions if you can help it. You don’t want to trap moisture inside.
Charging and Heat
On very sunny hot days, the enclosure can warm up. The battery and electronics are generally fine up to 50-60C, but it’s good to keep the node out of extreme heat if possible. The black plastic will absorb heat; a bit of shade during the peak afternoon might prolong battery life.
Testing
Test the node on the bench (or in your yard) before deploying in a hard-to-access spot. Make sure it charges in sunlight (you can measure the battery voltage in morning vs evening to see that it’s higher after sun exposure, indicating charge).
Using the USB-C port with a serial console or the companion app’s battery telemetry will show you the battery level so you can confirm the solar charging is working.
Who This Build Is For
If you need a low-cost outdoor mesh node for fence lines, rural property boundaries, or a first solar deployment, the Harbor Breeze build is hard to beat. Total parts cost sits around $60-70 depending on which WisBlock modules you add, and the enclosure is already weatherproofed and UV-resistant.
If you need a full-power repeater at a ridgeline with heavier panels, stronger antennas, and more battery headroom, look at a purpose-built solar repeater instead. The Harbor Breeze’s 0.5W panel and 1500 mAh battery are sized for a low-duty-cycle node, not a busy backbone repeater.
If you want something even easier with fewer steps, commercial solar mesh nodes like the RAK WisMesh 1W Booster Kit or the Yeti Wurks base station get you online without soldering.
A properly built Harbor Breeze node will run unattended for months. The sealed compartment, the trickle charger in the RAK WisBlock base, and the low idle draw of an nRF52840 all work in your favor. Once it’s on the fence line, you forget about it.
This guide was informed by the MeshCore and Meshtastic community project notes and RAKwireless documentation. Build photos and wiring diagram credit: u/cowdog360 on Reddit and the mesh community.
Comments
Related Posts
Seeed MeshCore Starter Kit: Solar Repeater + Client Bundle
Seeed's MeshCore Starter Kit bundles a solar repeater and Wio Tracker L1 Pro into one off-grid mesh. Antenna picks, setup tips, and who it's for.

MeshCore Path Hash Modes Explained: 1, 2, and 3 Byte
How MeshCore's 1, 2, and 3 byte path hashes work, why 1-byte collides at scale, and when to switch. Guide to path.hash.mode for growing meshes.

Meshtastic Range Test: Map Your Mesh Coverage
Measure and map Meshtastic coverage with the range test module, trace route, signal metrics, and MeshMapper. Field tips for flat-plains deployments.